Scar Therapy – What is it and how can it help?


Anna Everest has trained in the renowned Restore Scar Therapy method, a specialised approach designed to support healing after surgery, injury, or oncology treatment. These techniques help to improve the comfort, mobility, and appearance of both post‑surgery scars and oncology‑related scars, offering gentle, effective support throughout your recovery. Read on to learn how scar therapy works and how it may benefit your healing journey

What Is Scar Therapy?

Scar therapy—also known as scar massage or scar tissue treatment—is a gentle, hands‑on approach designed to reduce scar tissue build‑up and support healthy healing after surgery, trauma, or injury. This non‑invasive technique helps remodel scar tissue, improve mobility, and restore comfort in the affected area.

During a scar therapy appointment, the therapist assesses not only the scar itself but also the movement and function of the surrounding tissues and the whole body. This holistic approach ensures that restrictions caused by the scar are identified and addressed.

Each treatment plan is personalised. Clients receive in‑clinic scar therapy as well as tailored scar massage techniques and exercises to continue at home, helping to maintain progress between sessions and support long‑term healing.


Why Is Scar Therapy Important?

Scar tissue behaves differently from healthy tissue—it is typically thicker, less flexible, and more fibrotic. Without proper care, this can lead to discomfort, restricted movement, and cosmetic concerns.

Scar therapy helps by:
• Improving circulation to the scar and surrounding tissues
• Increasing mobility and reducing tightness
• Supporting hydration and nutrient delivery through the use of creams, gels, or silicone products
• Enhancing healing and reducing the risk of long‑term restrictions
• Improving the cosmetic appearance of the scar over time

This is especially important for scars located near joints, where stiffness can limit range of motion.
Scars can also carry emotional weight. Many people experience a boost in confidence, body comfort, and mental wellbeing as their scar softens, moves more freely, and becomes less noticeable.


What About Problematic Scars?

Some scars become uncomfortable, raised, or overly sensitive. Scar therapy can help manage and improve:

• Itching, sensitivity, or discomfort by increasing mobility and blood flow
• Hypertrophic scars (raised, firm scars)
• Keloid scars (thick, overgrown scar tissue)

Manual therapy techniques combined with silicone sheeting, gels, or topical products can help reduce tension, soften the scar, and improve overall appearance and comfort.


When Can You Start Scar Therapy?

Most people can begin scar therapy 6–8 weeks after surgery, provided the wound is fully healed, scabs have fallen off naturally, and there are no signs of infection.
If you’re unsure whether your scar is ready, a therapist can assess it safely and guide you on the best time to begin treatment.

Ready to Get Started?

Book a session with Anna Everest, our recently qualified scar therapy practitioner and experienced Cancer Rehab Physiotherapist.
Initial scar therapy appointments are 1 hour to allow for a full assessment and treatment. Anna works across both of our clinics and is available to support you through every stage of your healing journey.


Fuel Your Rehab: Nutrition for Tendons, Bones & Muscles


For active individuals, injury often is the result of a mismatch between activity and recovery. This can even apply to “acute” injuries. In these cases there is often an underlying imbalance between wear and repair with the seemingly acute injury just being the tip of the iceberg. One way we can shift the balance towards recovery both before and after an injury is through nutrition. For that reason, I’ve put together an evidence-based guide for nutrition to support injuries to tendons, bones, and muscles.

A quick word on supplement quality

There are many supplement companies, not all are high quality. There are many examples of contamination with lead, illegal substances, or even not having the claimed ingredient at all. Look for companies that complete third party testing and make the results freely available. Examples include the NZ brand No Whey and companies with NSF certification such as Thorne or Momentous.

Tendons – support collagen production

Tendons are primarily composed of collagen. Our bodies can make its own collagen from amino acids using vitamin C but there is some evidence that combining injured tendons with supplemental collagen whilst resistance training can improve recovery speed. 

Practical suggestions:

  • Complete sources of protein: Ensure overall protein intake is sufficient so healing isn’t limited by basic building blocks. In the general sense high-protein diets support tissue repair.
  • Collagen or gelatin: 10 – 15g daily. Potentially taking it 30-40 minutes before rehab exercises could improve the effectiveness but this hasn’t been studied. There is some doubt that it can help prevent injuries, however it can improve recovery. Supplementation is the easiest way to reach this number, however bone broth is a less processed source.
  • Vitamin C: Taking Vitamin C with collagen is prudent as it is an essential co-factor for synthesis — examples include citrus fruits, berries, kiwi, and raw capsicum

Fractures – Load up on micronutrients for bone health

Bone repair is an energy- and nutrient-intensive process, not to mention the added calorie burn if you are using crutches. Certain micronutrients are foundational:

What Helps:

  • Calcium: Needed for bone mineral formation — aim for food sources like dairy, almonds, or fortified plant milks. Supplementation can be dangerous – high calcium levels are no joke, so stick to dietary sources where possible.
  • Vitamin D: Enhances calcium absorption; adequate sunlight and vitamin D status are important. This tends to be less of an issue in Aotearoa New Zealand in summer, however in winter (especially in the South Island), supplementation is often helpful.
  • Vitamin C and collagen: Collagen is also part of bone and can help in the same ways we discussed above.
  • Avoid excess vitamin A: High doses may interfere with bone formation. For this reason a multivitamin with high amounts of vit A may not be worth your time.

Stress Fractures – fuel yourself properly

Bone stress injuries are a signal. Often your body is telling you that you are under-fueling relative to training load, usually combined with suboptimal nutrients. Research shows low energy availability is a big risk factor.

What to do:

  • Meet your calories: When we eat enough, our body can put more resources towards adapting and repairing damaged tissues. If not, this can lead to a slow accumulation of damage and eventually a break in the bone. This is a particular issue in sports that prioritise low body mass.
  • Carbohydrate support: Getting enough carbs will refuel your training and prevent muscle protein from being used as fuel.
  • Calcium + vitamin D: People who train frequently and sweat a lot can become calcium deficient despite their dietary calcium meeting the RDA. If this sounds like you then consider finding a provider that offers sweat testing to see how much calcium you are losing.

Muscle Injuries – Protein, Creatine & Omega-3s

When muscle is injured or immobilised, the body shifts into catabolic (breakdown) mode unless you counter it nutritionally.

Recovery Essentials

  • Protein: High intake (e.g., 1.6–2.3 g/kg/day) supports muscle protein synthesis. 
  • Creatine monohydrate: Everyone is talking about creatine currently and for good reason. It can help preserve muscle mass during immobilisation and support rehabilitation although we need more studies before we can be sure of this. 3-5g/day is enough for muscle saturation, don’t worry about a “loading phase”.
  • Omega-3 fatty acids: New research has emerged showing the muscle saving benefits of high omega 3. Fatty fish such as salmon will provide both protein and omega 3s, ticking 2 boxes at once. Aim for 1-2g/ day combined EPA and DHA, and up to 5g/ day has been shown to have benefit.

Take home message

There is no one magic bullet for injury healing, however targeted nutrition plus rehab and activity modification can get you back on track and doing what you love.


Got any questions about injuries or rehab? To book an appointment with us visit our clinic page at https://queenstownphysiotherapy.com/ or phone 03 441 0580.

Our articles are not designed to replace medical advice. If you have an injury we recommend seeing a qualified health professional.


Sources

Tendon – https://pmc.ncbi.nlm.nih.gov/articles/PMC9354648/

Fracture – https://pmc.ncbi.nlm.nih.gov/articles/PMC5804294/

Stress fractures – https://pmc.ncbi.nlm.nih.gov/articles/PMC8746600/

Muscle injuries – https://pmc.ncbi.nlm.nih.gov/articles/PMC8746600/


Why you should (and shouldn’t) care about training zones

Who is this article for?

  • People who want to improve their heart health and longevity
  • People who want to advance their training and improve their cardiovascular fitness
  • Those interested in training zones and want to know if it is for them

Training zones: Why should we care?

  • VO2max
    • VO2max is one of the best predictors of longevity and long term health that we have. If you want to age well and maintain your health into old age then having a high VO2max is essential
    • Heart rate training is an excellent tool to let you know if you are training at the right intensity to improve this
  • Endurance
    • Certain heart rate zones can improve aerobic fitness, allowing you to train for longer using the most efficient system our body has
  • Preventing aerobic deficiency
    • It’s theorised that doing too much high intensity training whilst training for longer distances could handicap you by teaching your body to work anaerobically and therefore less efficiently

Understanding Training Zones: The Five Zone Model

The ACSM* divide training intensity into five heart-rate zones, which are based on rough percentages of your maximum heart rate. This doesn’t tend to be useful as highly trained athletes can be in Zone 2 at 85% of their maximum heart rate whilst certain heart or metabolic conditions can lead people to be in Zone 4 whilst sat on the sofa. We instead suggest using RPE (rate of perceived exertion out of 10) aka effort to measure which zone you are in.

  • 🟢 Zone 1 (RPE 1-2/10): Very light – used for active recovery, warm-up/cool-down, and low-stress aerobic conditioning.
  • 🟢 Zone 2 (RPE 3-4/10): Light – used for aerobic base training— Enhances mitochondrial function & endurance capacity. As a guideline for effort, in this zone you should be able to hold a conversation over phone call. It won’t be a comfortable conversation and the person on the other end of the call should know you are exercising but other than taking a breath between phrases the conversation should still be able to flow.
  • 🟡 Zone 3 (RPE 5-6/10): Moderate: Tempo running or “grey zone”—elevated lactate production, generally used as race pace training.
  • 🔴 Zone 4 (RPE 7-8/10): Vigorous: Anaerobic threshold—improves lactate tolerance, VO₂ threshold output, sustainable high-intensity effort (e.g. tempo intervals). A big feature of “Norwegian Method” style of training
  • 🔴 Zone 5 (RPE 9–10/10): Maximal effort—short all-out bursts to raise VO₂max and anaerobic power; only a few minutes per session due to high load.

Why These Zones Matter

Zone 2: Aerobic Base

A study of college triathletes found that those who spent at least 20 % of training time in Zone 2 improved their aerobic efficiency dramatically more than those who stayed predominantly in Zone 1. Between the two groups VO₂ₘₐₓ didn’t differ but this allowed the Zone 2 group to perform at higher intensity with less fatigue.

Zone 3: Race tempo

Largely neglected as a training zone, this is a good option for race specific practice, particularly in distances around 10km. Many consider this zone as “junk volume” where you aren’t focussing on one area to improve.

Zone 4 & 5: Threshold and VO₂ₘₐₓ

Interval-based training in Zones 4–5—such as HIIT or tempo intervals—has been shown to produce greater VO₂ₘₐₓ improvements compared to moderate continuous training, especially in less trained individuals. These zones raise lactate tolerance (muscle burning activities) and power output—critical for race surges and high-demand efforts.

Practical Guidelines

Training Distribution: 80/20, Polarized or Norwegian

  • Many experts endorse an 80/20 model: ~80 % of training in Zones 1–2, ~20 % in Zones 4–5, with minimal of Zone
  • A polarized model (lots of low plus some very high intensity, little middle) is shown effective across many endurance sports.
  • Norwegian – this method is for the data nerds (Paul), it relies on blood lactate testing and being at or near your anaerobic threshold whilst training. The downside is the high amount of time spent at higher intensities can lead to higher risk of injury and overtraining

Discipline specific takeaways

  • Runners: Split training between long Zone 2 runs, tempo runs in Zones 3–4, uphill sprints in Zone
  • Cyclists: Steady Zone 2 rides; threshold efforts (20–60 min in Zone 4); short power surges in Zone
  • Rowers/Swimmers/Team Athletes: Mix extended aerobic drills at Zone 2, repeat high-intensity efforts mimicking game/race conditions in Zones 4–5.

What are the alternatives?

Smart watches & fitness trackers

Using the heart rate ranges on your smartwatch is a common way of tracking exercise intensity but as mentioned above, different people have different zones and there are many factors that can influence this. Additionally, smart watches and fitness trackers use generic algorithms to predict heart rate zones that may not take into account all the individual variation.


Blood lactate testing

The most scientific way to assess training intensity is by using blood lactate testing – this gives you an exact indicator of which energy system you are predominantly working in and a number to use for reference. You could use this every time you train or just to help you set heart rate or learn the appropriate amount of effort. Again, lactate can vary day to day depending on how recovered you are but it is the most accurate and scientific way to approach training


*American college of sports and exercise medicine

The Ultimate Skiing Workout

A quick guide to preparing your body for ski season by Jack Embleton


As the season approaches, we are filled with anticipation and excitement for hitting the slopes. Whether you’re carving through powder or mastering new tricks, being physically prepared is key to maximizing your performance from the first run and minimizing the risk of injury. This article is for those who want to be ready to go as soon as the lifts open and want to prevent an injury ruining their ski season.

Strength Power Training


Pulse Squats with controlled eccentric: 15 – 20 reps for 3 sets.
Squats are fundamental for building lower body strength, crucial for skiing. For skiing we aren’t worried about the top part of the movement as we spend all of our time with our knees bent between 30 and 80 degrees. This is why pulse squats are so good, keeping the muscle working in the range we want them and tapping into the anaerobic energy system that gets used so much when skiing.


Keep the reps slow and controlled, don’t fully lock out at the top

via Imgflip


Skater lunges: 30 – 60s of maximum effort. Repeat 4 times with a big break between sets.
Tight, fast turns require fast muscle contractions that agility exercises replicate really well. One cause of dreaded ACL injury is when the knee goes into valgus/ bends inwards. These exercises train you to avoid that movement, reducing your risk of a big ligament injury.

Make sure the knees don’t collapse inwards.

via Imgflip


Step-Ups with heel touch: 3 sets of 15 – 20 reps
Step-ups primarily strengthen the quads and glutes. Use a sturdy bench or platform and increase the height to increase the challenge. The heel touch encourages control and eccentric quad muscle power and avoids using a toe push off to help.

Slow, controlled reps with just a light touch on the floor. Use a wall, if you need balance

via Imgflip


Tib ant raises: 15 – 20 reps for 3 sets
Freestyle skiers will need this more than any other types of skiers. In order to land big jumps you
need to be able to keep your weight forward instead of either sitting back and wiping out.

Start with both legs before progressing to single leg

via Imgflip


Core Stability

Side planks with dips: As many reps as you can for 2 sets.
Without strong core muscles, we can’t efficiently transfer the force from our lower body to our upper body. Side planks help you resist the forces when turning.

Lightly touch the hip to the ground, then continue without resting

via Imgflip


Russian Twists: 10 – 15 reps for 2 sets
In a similar vein to the above, the abs need to be strong in rotation in order to keep things stable in tight turns.

These should be done quickly to replicate fast turns. Keep your belly button pulled towards your spine for deep core engagement.

via Imgflip


Cardiovascular Conditioning

Skiing can use a mixture of strength, endurance and high intensity physical energy, meaning that our cardio workouts need to replicate this. The worst-case scenario would be getting worn out after two runs, when the excitement for the season has been building up for so long.

Interval Training: start with a 15-minute session and build from there

High-intensity interval training (HIIT) boosts cardiovascular fitness and mimics the intense bursts of energy required for skiing. You can include exercises like sprinting, cycling, or rowing in your workout. Heart rate during fast runs reaches about 80-95% of your maximum heart rate so this is what you should aim for.

Endurance training: 30 mins. You should be able to maintain a conversation throughout

Accounting for approximately 20-30% of your energy demands during skiing is the oxidative system.
In order to train this, you need to be going low and slow. Running, swimming and other similar
exercise types will all work here; personal preference is key.

Conclusion

If you don’t want to be sore and hurting after opening day then incorporating some of these exercises will give you a massive head start. See you out there!


References
Nessler, T., Denney, L., & Sampley, J. (2017). ACL Injury Prevention: What Does Research Tell
Us?. Current reviews in musculoskeletal medicine, 10(3), 281–288. https://doi.org/10.1007/s12178-
017-9416-5
Davey, A., Endres, N. K., Johnson, R. J., & Shealy, J. E. (2019). Alpine Skiing Injuries. Sports
health, 11(1), 18–26. https://doi.org/10.1177/1941738118813051
Penitente G, Young HA, Sands WA, McNeal JR. A Classification of Fitness Components in Elite Alpine
Skiers: A Cluster Analysis. Int J Environ Res Public Health. 2023 May 17;20(10):5841. doi:
10.3390/ijerph20105841. PMID: 37239567; PMCID: PMC10218050.
Zorko, M., Nemec, B., Babič, J., Lešnik, B., & Supej, M. (2015). The Waist Width of Skis Influences the
Kinematics of the Knee Joint in Alpine Skiing. Journal of sports science & medicine, 14(3), 606–619.
Hydren, Jay R. MS, CSCS; Volek, Jeff S. PhD, RD; Maresh, Carl M. PhD; Comstock, Brett A. MA;
Kraemer, William J. PhD, CSCS*D, FNSCA. Review of Strength and Conditioning for Alpine Ski Racing.
Strength and Conditioning Journal 35(1):p 10-28, February 2013. | DOI:
10.1519/SSC.0b013e31828238be
Vernillo, G., Pisoni, C., & Thiébat, G. (2018). Physiological and Physical Profile of Snowboarding: A
Preliminary Review. Frontiers in physiology, 9, 770. https://doi.org/10.3389/fphys.2018.00770

Weird and wonderful strategies for improving exercise performance

Swearing 

Swearing! That’s right, our parents aren’t right about everything! Swearing has all sorts of good effects. Studies show positive physical, psychological, and social effects that simply aren’t found with polite language. Specifically, when it comes to exercise, swearing seems to increase pain tolerance, increase power output in anaerobic testing, and improve grip strength. The authors of the review recommend not doing it too frequently though, it might lose its power if we get too used to it. We would also advise against trying this one in a crowded gym at 5pm… 

Verdict: Weird and wonderful


Brain endurance training

Mental fatigue is pretty detrimental for exercising. Motivation goes down, performance suffers, and it can become a big barrier when you need to push through a tough workout. Good news though, you can train your brain to become less fatigued during exercise and this will have a knock-on effect for boosting your endurance workouts. Participants who did brain training before their endurance training saw double the improvement of the group that only completed physical training (12% vs 24%).

If you want to give this a go at home look up an online Stroop test and give it a go for a few weeks. Alternatively, regular meditators have shown to have a higher threshold for exhaustion. Even better, studies show that meditation can help runners “get in the zone” better, making the run feel even more effortless.

Verdict: Weird and wonderful


Social competition

It seems intuitive that this is true but there are some nuances to it. There are two main ways that exercise performance improves in a social context. The first is through competition and the second is encouragement. Studies that have people competing against one another show much higher attendance in groups where people can see their individual score and their opponents’ as opposed to when they are working towards a total team score.

Encouragement also seems to be a powerful tool for both short and long bouts of exercise, one study looked at static biking and found that having someone to encourage you was enough to boost power output in both sprint and endurance conditions. The improvements were modest but who doesn’t want to be cheered along on a ride?

Verdict: Wonderful


Smelling salts

Smelling salts conjure up the image of heavy lifts in the gym with lots of shouting and screaming but in reality the evidence seems to suggest this is where they are the least effective. CrossFit, Hyrox, and HIIT is where they really shine. These all require repetitive bouts of high intensity and the evidence shows that people get a good performance boost from using smelling salts prior to workouts. This isn’t to say that they aren’t good for lifting in the gym, they improve perception of performance for heavy lifting which in itself could be worthwhile, but that seems to be where the improvement ends.

Verdict: Mostly weird, sometimes wonderful


References

Bender & Popkin. Ammonia Inhalants: Use, Misuse, and Role in Sports Performance. Sports Health. 2024.

Dallaway et al., Prior brain endurance training improves endurance exercise performance. Eur J Sport Sci. 2023.

Edwards et al., Impact of active and passive social facilitation on self-paced endurance and sprint exercise: encouragement augments performance and motivation to exercise. BMJ Open Sport Exerc Med. 2018.

Nien et al., Athletes with meditation experience counteract the detrimental effect of mental fatigue on endurance performance and neurocognitive functions. Journal of Sports Sciences. 2024.

Washmuth et al., Effect of swearing on physical performance: a mini-review. Front Psychol. 2024

Zhang et al., Support or competition? How online social networks increase physical activity: A randomized controlled trial. Prev Med Rep. 2016.

5 Running mistakes that lead to injury


Running is a fantastic way to exercise for both physical and mental health. There is a common belief that running is damaging to your joints and “wears them out” but research has shown that runners have less knee pain and less arthritis than non-runners . Running injuries can be caused by a number of factors so we have gathered some suggestions to help you be proactive and keep you running healthy.

1. Doing too much high intensity running

Casual or inexperienced runners often spend most or all of their training time running at high intensities. This may come from the belief that every run needs to be tough or challenging and creates a mindset which can lead to overtraining and injury. In contrast, elite endurance athletes spend roughly 80% of their training time doing low intensity training with the remaining 20% spent at high intensity. A study in 2014 found that the most effective way to increase fitness (VO2max and work capacity) was splitting training mainly between low and moderate intensity with a small amount of high intensity. How you split your training comes down to your goals and preferences.

2. Not paying attention to elevation gain

Elevation is a very powerful tool, particularly for events that have a lot of elevation changes. If not used appropriately it can again lead to overtraining at high intensity. Most runners pay close attention to the increase in distance they are doing but less commonly look at their elevation gain. We would recommend that on weeks you increase your distance you maintain the same or similar elevation gain and vice versa for weeks with more elevation gain. Intense runs with lots of elevation gain should be followed up with a rest day or a recovery run.

3. Not planning out rest weeks

Improvement in running comes from doing exercise that stresses the body and then giving it the time, nutrition and rest to grow and adapt. Whilst most people are familiar with rest days during the week, less are aware of the importance of a rest week. When planning out your training schedule, we recommend every 3-4 weeks taking a step back and reducing your total running distance for that week by 10%. This gives your body a chance to adapt to the demands on it without having to stop running completely.

4. Avoiding strength training

A recent study showed that recreational runners who strength train and foam roll 2x/ week were 85% less likely to sustain a running injury. Strength training is not a quick fix and can take 6-8 weeks before the benefits are noticed, but the results are hard to argue with. All the muscles of the lower limb are active during running so focus on exercises for the main muscle groups. Examples include squats, Romanian deadlifts, and calf raises.

5. Not giving yourself enough training time

If you are training for an event or a race it is recommended to allow yourself more time than you think you need, particularly if it’s your first race. Taking your training slow gives you more time to experiment with what works for you. It also means that if you do have an injury setback you can rehab it more effectively instead of having to push through and potentially cause further injury.

Got any questions about running injuries or programming? To book an appointment with us visit our clinic page at https://www.queenstownphysiotherapy.com/ or phone 03 441 0580.
Our articles are not designed to replace medical advice. If you have an injury we recommend seeing a qualified health professional.

Sleeping Better

Sleeping Better

Why do we sleep?
Sleep is a vital bodily function which allows the body and brain to recharge. Sleeping is important for memory retention and to maintain good cognitive function. When we fail to get enough sleep, it can have a detrimental effect on our bodies.

Lack of sleep can:


How does my body know when it’s time to fall asleep?
Your body has an “internal clock” known as your Circadian Rhythm. One of the processes controlled by this “clock” is your sleep-wake cycle. This cycle is closely tied to light. In the day, the light stimulates signals that keep us alert and active and at night the reduced light exposure promotes the production of Melatonin, a hormone which helps us get to sleep and keep us asleep.
Not everyone has the same sleep-wake cycle , 30% of the adult population are known as “owls”, in that they will feel more tired later at night and tend to wake up later in the morning when given the choice, this is even more common in your teenage years. Other people will find the opposite and are known as “larks”. They feel more tired earlier at night and prefer to get up earlier in the morning, which is more common as we get older. This is thought to be caused by genes we inherit.


How much sleep do we need?
The amount of sleep we need changes depending on our age, this typically starts out longer when we’re younger and gets shorter as we age but stays between 7-9 hours for most of our life. The table below is taken from the sleepfoundation.org recommendations.


Age Group Age Range Recommended Amount of Sleep per Day:

Newborn 0-3 months              14-17 hours
Infant 4-11 months                  12-15 hours
Toddler 1-2 years                     11-14 hours
Preschool 3-5 years                 10-13 hours
School-age 6-13 years             9-11 hours
Teen 14-17 years                      8-10 hours
Young Adult 18-25 years       7-9 hours
Adult 26-64 years                   7-9 hours
Older Adult 65 years +          7-8 hours


How do I know if I am getting enough sleep?

Activity trackers and smart watches have been shown to be good at measuring time
in bed but poor at measuring the quality of sleep.

A simpler way is to ask yourself:
● Could you fall back asleep at 10am or 11am?
● If you did not set an alarm in the morning would you sleep past it?
● Could you function well without caffeine before noon?

If the answer to the first 2 questions are yes, then you are likely not getting enough sleep.
If the answer to the third question is no, you are likely using caffeine to self-medicate your lack of sleep.

What can I do to improve my sleep?

1. Try going to bed and getting up at the same time every day. It takes more than one or two nights to catch up on reduced sleep. So a lie in on the weekends might not be enough to catch up on sleeping poorly throughout the rest of the week.
2. Exercise can be great for increasing your sleep pressure (the desire to go to sleep).
3. Avoid caffeine after noon. Caffeine has a half-life of 6 hours, meaning a cup of coffee at 4pm is the same as having half a cup of coffee at 10pm.
4. Do not smoke. The nicotine in cigarettes act as a stimulant making it harder to get to sleep. Smokers can also be woken up earlier by nicotine cravings.
5. Avoid large meals and drinks just before bed. This can lead to indigestion which can interfere with sleep. Drinking too much before bed can lead to frequent awakenings to urinate.
6. Naps can be very useful in the early afternoon, but naps after 3pm can make it harder to sleep at night.
7. Relax before bed. Reading, listening to music or meditation can be a good way to relax before going to bed.
8. Thermal dump – Taking a hot shower or bath before bed can be a useful way to reduce your core body temperature which helps your body prepare for sleep. This is because our bodies will naturally drop about 1°C during sleep, when you get out of the hot water more of the blood will rise to the skin’s surface (this is why your face gets red when its warm) which means heat is lost more quickly, leading to a drop in core body temperature.
9. Make your bedroom a hibernation station, create an environment which is cool, dark, and quiet.
10. Reduce your screen time before bed, because the production of melatonin (the hormone which makes you tired) is tied with darkness. Blue light especially has been shown to delay the production of melatonin so downloading blue light filter apps such as “Twilight” can be helpful. Also using lamps and smaller lights in the evening can be a good way of reducing light exposure.
11. Getting exposure to light when you wake up can be useful in making you feel more awake, ideally outdoors with sunlight.
12. Do not lie in bed if you’re feeling awake, get up and do some relaxing activity such as reading and return when you feel tired. Clock watching can cause sleep anxiety by making us feel more stressed and less able to relax, to prevent this turn clocks around so they are not easily seen.


Further resources:

Cutting back on lawnmower injuries

Published on https://www.acc.co.nz/newsroom/stories  22 September 2023


The smell of freshly-cut grass is one of the classic senses of spring, but ACC is challenging all New Zealanders to be safe when they pull their lawnmower out of the shed.


ACC accepted 6,922 lawnmowing-related injuries in 2022 – the highest number of claims since 2019.  These injuries came at a cost of $12.6 million to help people recover.

ACC injury prevention leader James Whitaker says it feels great to get the lawns done so you’re free to do other things, but he encourages people to slow down to consider the risks of injury.

“Our data shows injuries are more likely to happen at our homes than anywhere else,” James says.

“No one wants to start their weekend getting ready to mow the lawns or do a DIY job and then end up in accident and emergency with an injury.

“The good news is these injuries are preventable. You can stop them from happening if you take a moment to consider the risks before you get stuck in.”

Free Person Using Lawn Mower Stock Photo

Lawnmowing injuries by the numbers

In Aotearoa, the grass grows fastest during the spring months, and this is reflected in the injury data.

In August 2022, ACC accepted 423 lawnmowing-related injury claims and these increased throughout the months of spring – September (550), October (690) and November (839).

The leading regions for lawnmowing injuries in 2022 were Auckland (1,986), Waikato (932), Canterbury (693) and Northland (493).

Last year, males (4,540) were almost twice as likely to suffer a lawnmowing injury compared to females (2,382).

The most common types of injury were mostly soft tissue Injuries (5,334), ahead of laceration/puncture/sting (915) and fracture/dislocation (154).

Free A Person Cutting Grass With a Lawn Mower Stock Photo

‘Have a Hmmm’ before you get stuck into DIY

Alongside lawnmowing injuries, ACC accepted 19,300 DIY injury claims in 2022. These injuries came at a cost of $30 million to help people recover. This was the highest cost over the past five years.

“We know many people will use spring as an opportunity to do some odd jobs around the house and garden,” James says.

“Our top tip for a safe DIY project is to slow down.  Many accidents in the home happen simply because people are rushing and not thinking about what they’re doing.

“We want everyone to have that satisfaction of completing their DIY project and also be injury free so they can enjoy their time with their whānau.”

Free Blue and yellow ball on green grass Stock Photo

Five things before you mow your lawn

  1. Do you have the right gear on? Always wear safest shoes possible (preferably steel-capped boots), earmuffs and safety glasses.
  2. Are your kids and other people nearby and in danger?
  3. Have you cleared the area of any debris (such as rocks, stones, hard sticks and branches etc?
  4. Do you know how to use the mower you’re using? If not, read the safety manual, watch the manufacturers videos on YouTube or chat to a mate who has used it.
  5. Have you thought of ways to mow the lawn without putting strain on your back?

Strength and Balance Training for Runners

Running is excellent aerobic exercise, is an amazing outdoor sport, and is accessible to anyone with very little equipment. It’s important to remember that running places large forces and physical
demands on the body regardless of your chosen distance, pace, or terrain. Without proper conditioning of the leg muscles along the biomechanical chain it can be easy to pick up injuries.
Running injuries include bone and soft-tissue injuries caused by sudden events like sprains or strains, or can be caused by repetitive injury and overuse. ACC data shows that there were 153,014 running related injuries reported between 2010 and 2020 in New Zealand. The majority of those affected were aged 10-54, with similar numbers of males to females… basically, running injuries can affect anyone at any time!

Every runner’s regular training routine should include some form of strength and balance training. Adding these types of exercises into your training can improve your overall performance in addition to preventing injury. Remember to choose exercises suitable for your level – if they are too easy then you won’t see improvements, and if they are too hard then you won’t perform well enough and will likely forget about them after a few sessions. This principle applies to both strength and balance exercises.

For strength training you can start with body-weighted exercises and progress to using weights as you become stronger. To build muscle strength you should pick an exercise and weight that allows you to perform somewhere between 8-12 reps well while making any further reps difficult. Complete 2-3 sets of 8-12 reps on 3 or more days each week to see improvement over time. To improve balance, you need to ensure that your exercises are challenging enough to stimulate your nervous system. Balance exercises often involve standing on one leg and keeping your balance
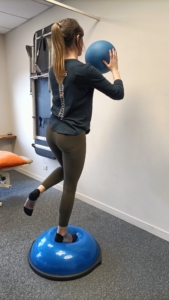
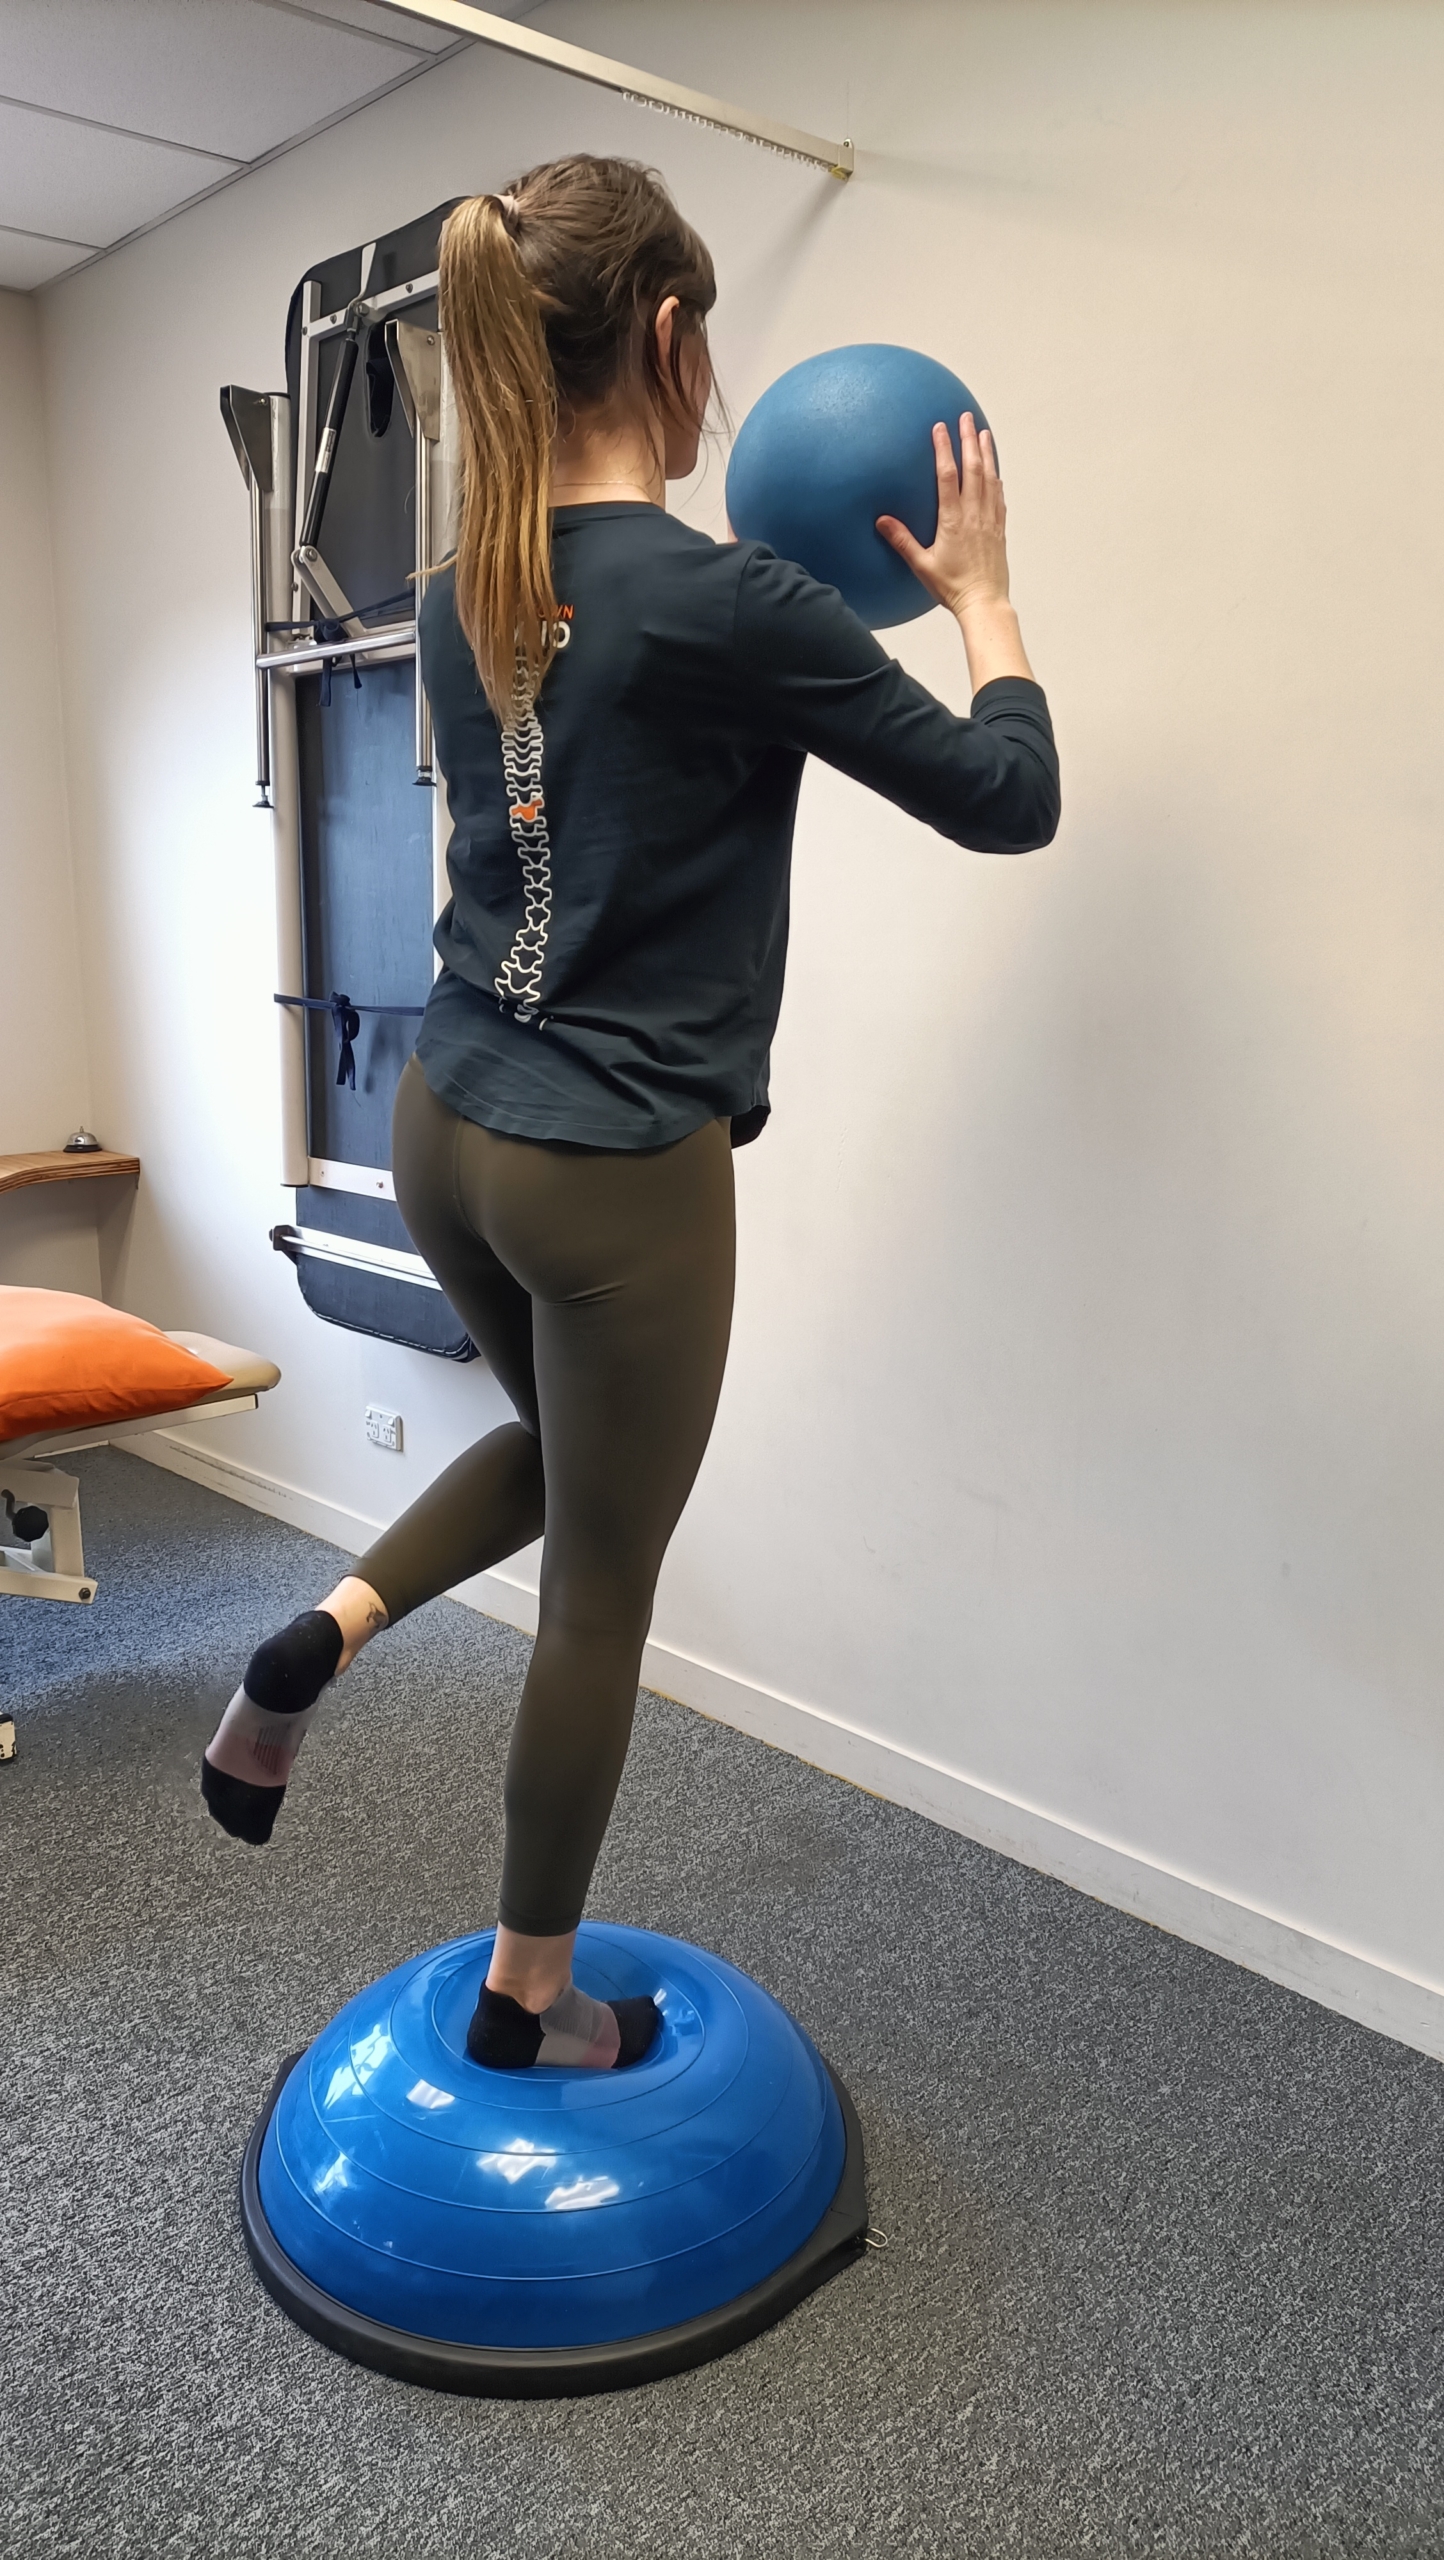
for as long as possible. Create challenging drills by standing on an uneven surface like a Bosu ball and add movement or distraction like throwing and catching a ball at the same time! Aim to complete 5-10 minutes of balance exercises on 2 days each week. If you’re unsure which exercises to choose – have a look at the examples below.

If you are serious about building a personalised training routine and incorporating strength and balance exercises that target your weaker areas, book an appointment with one of our physiotherapists for assessment and guidance.

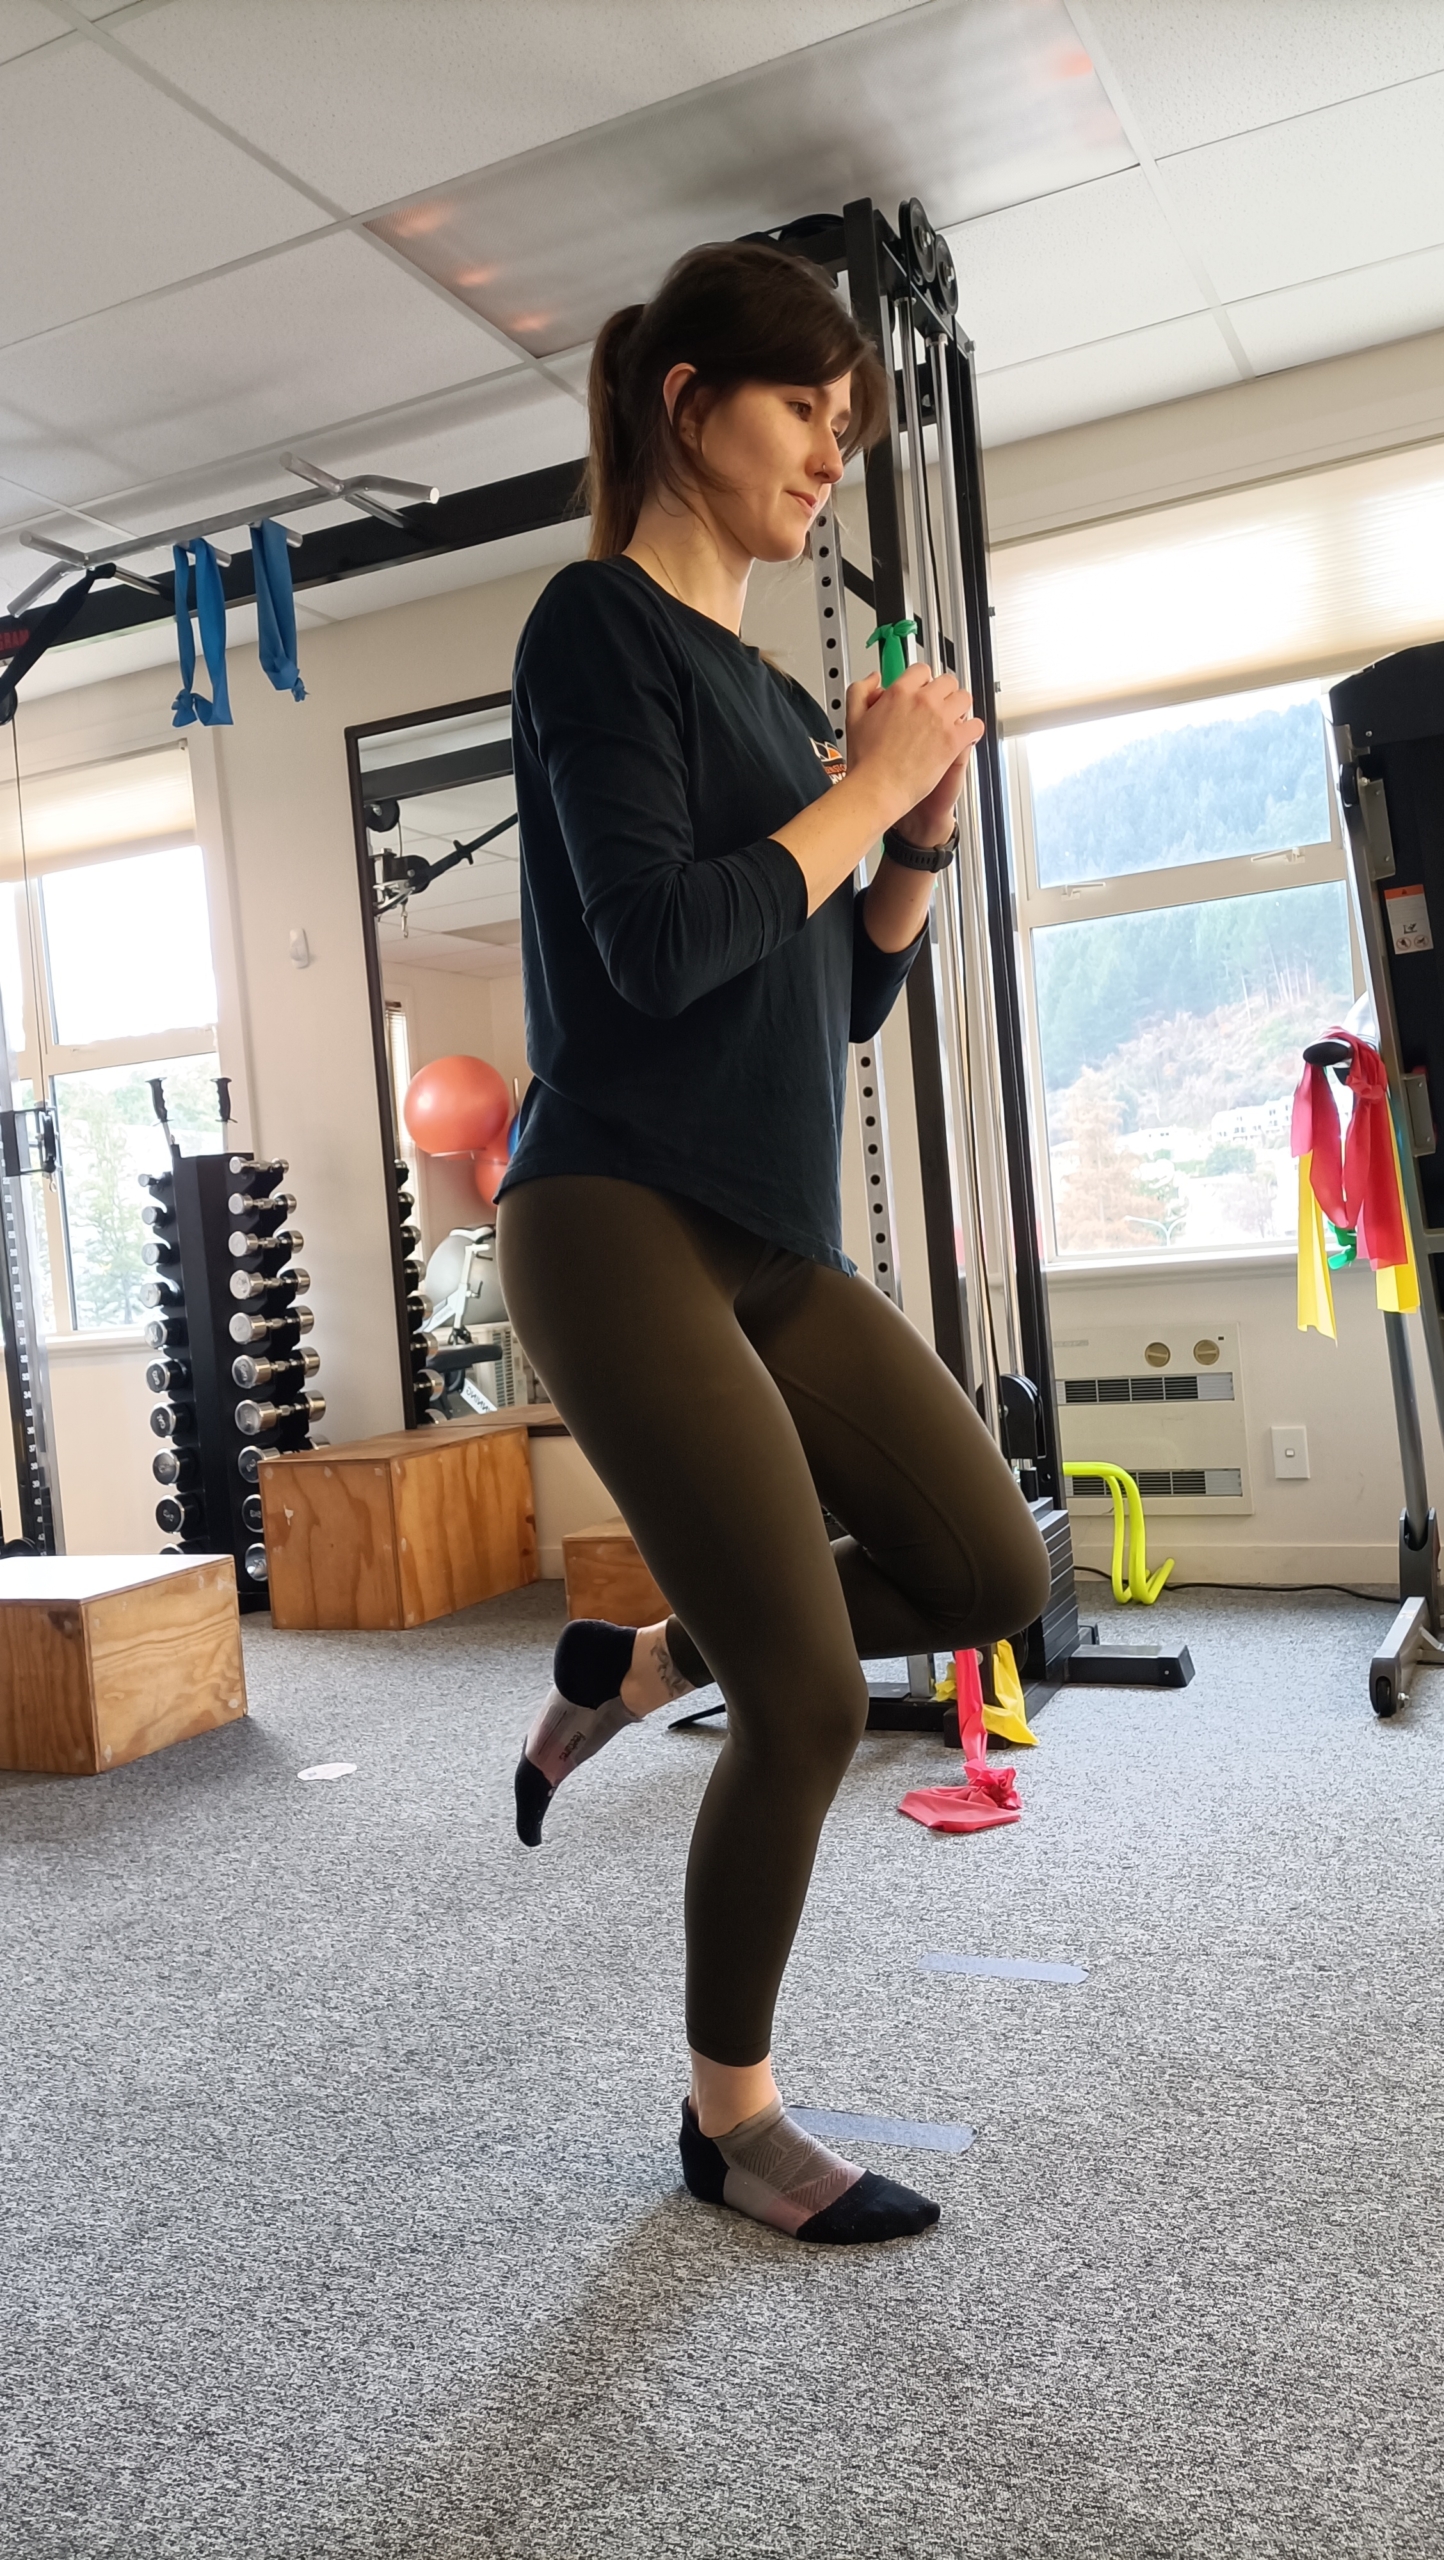
Single leg squat: Stand near a wall or table for support if you need it. Balance on your affected leg. Keeping the heel on the ground, bend your knee, ensuring the knee travels directly
forwards over your toes. Straighten back up fully, and repeat the movement.

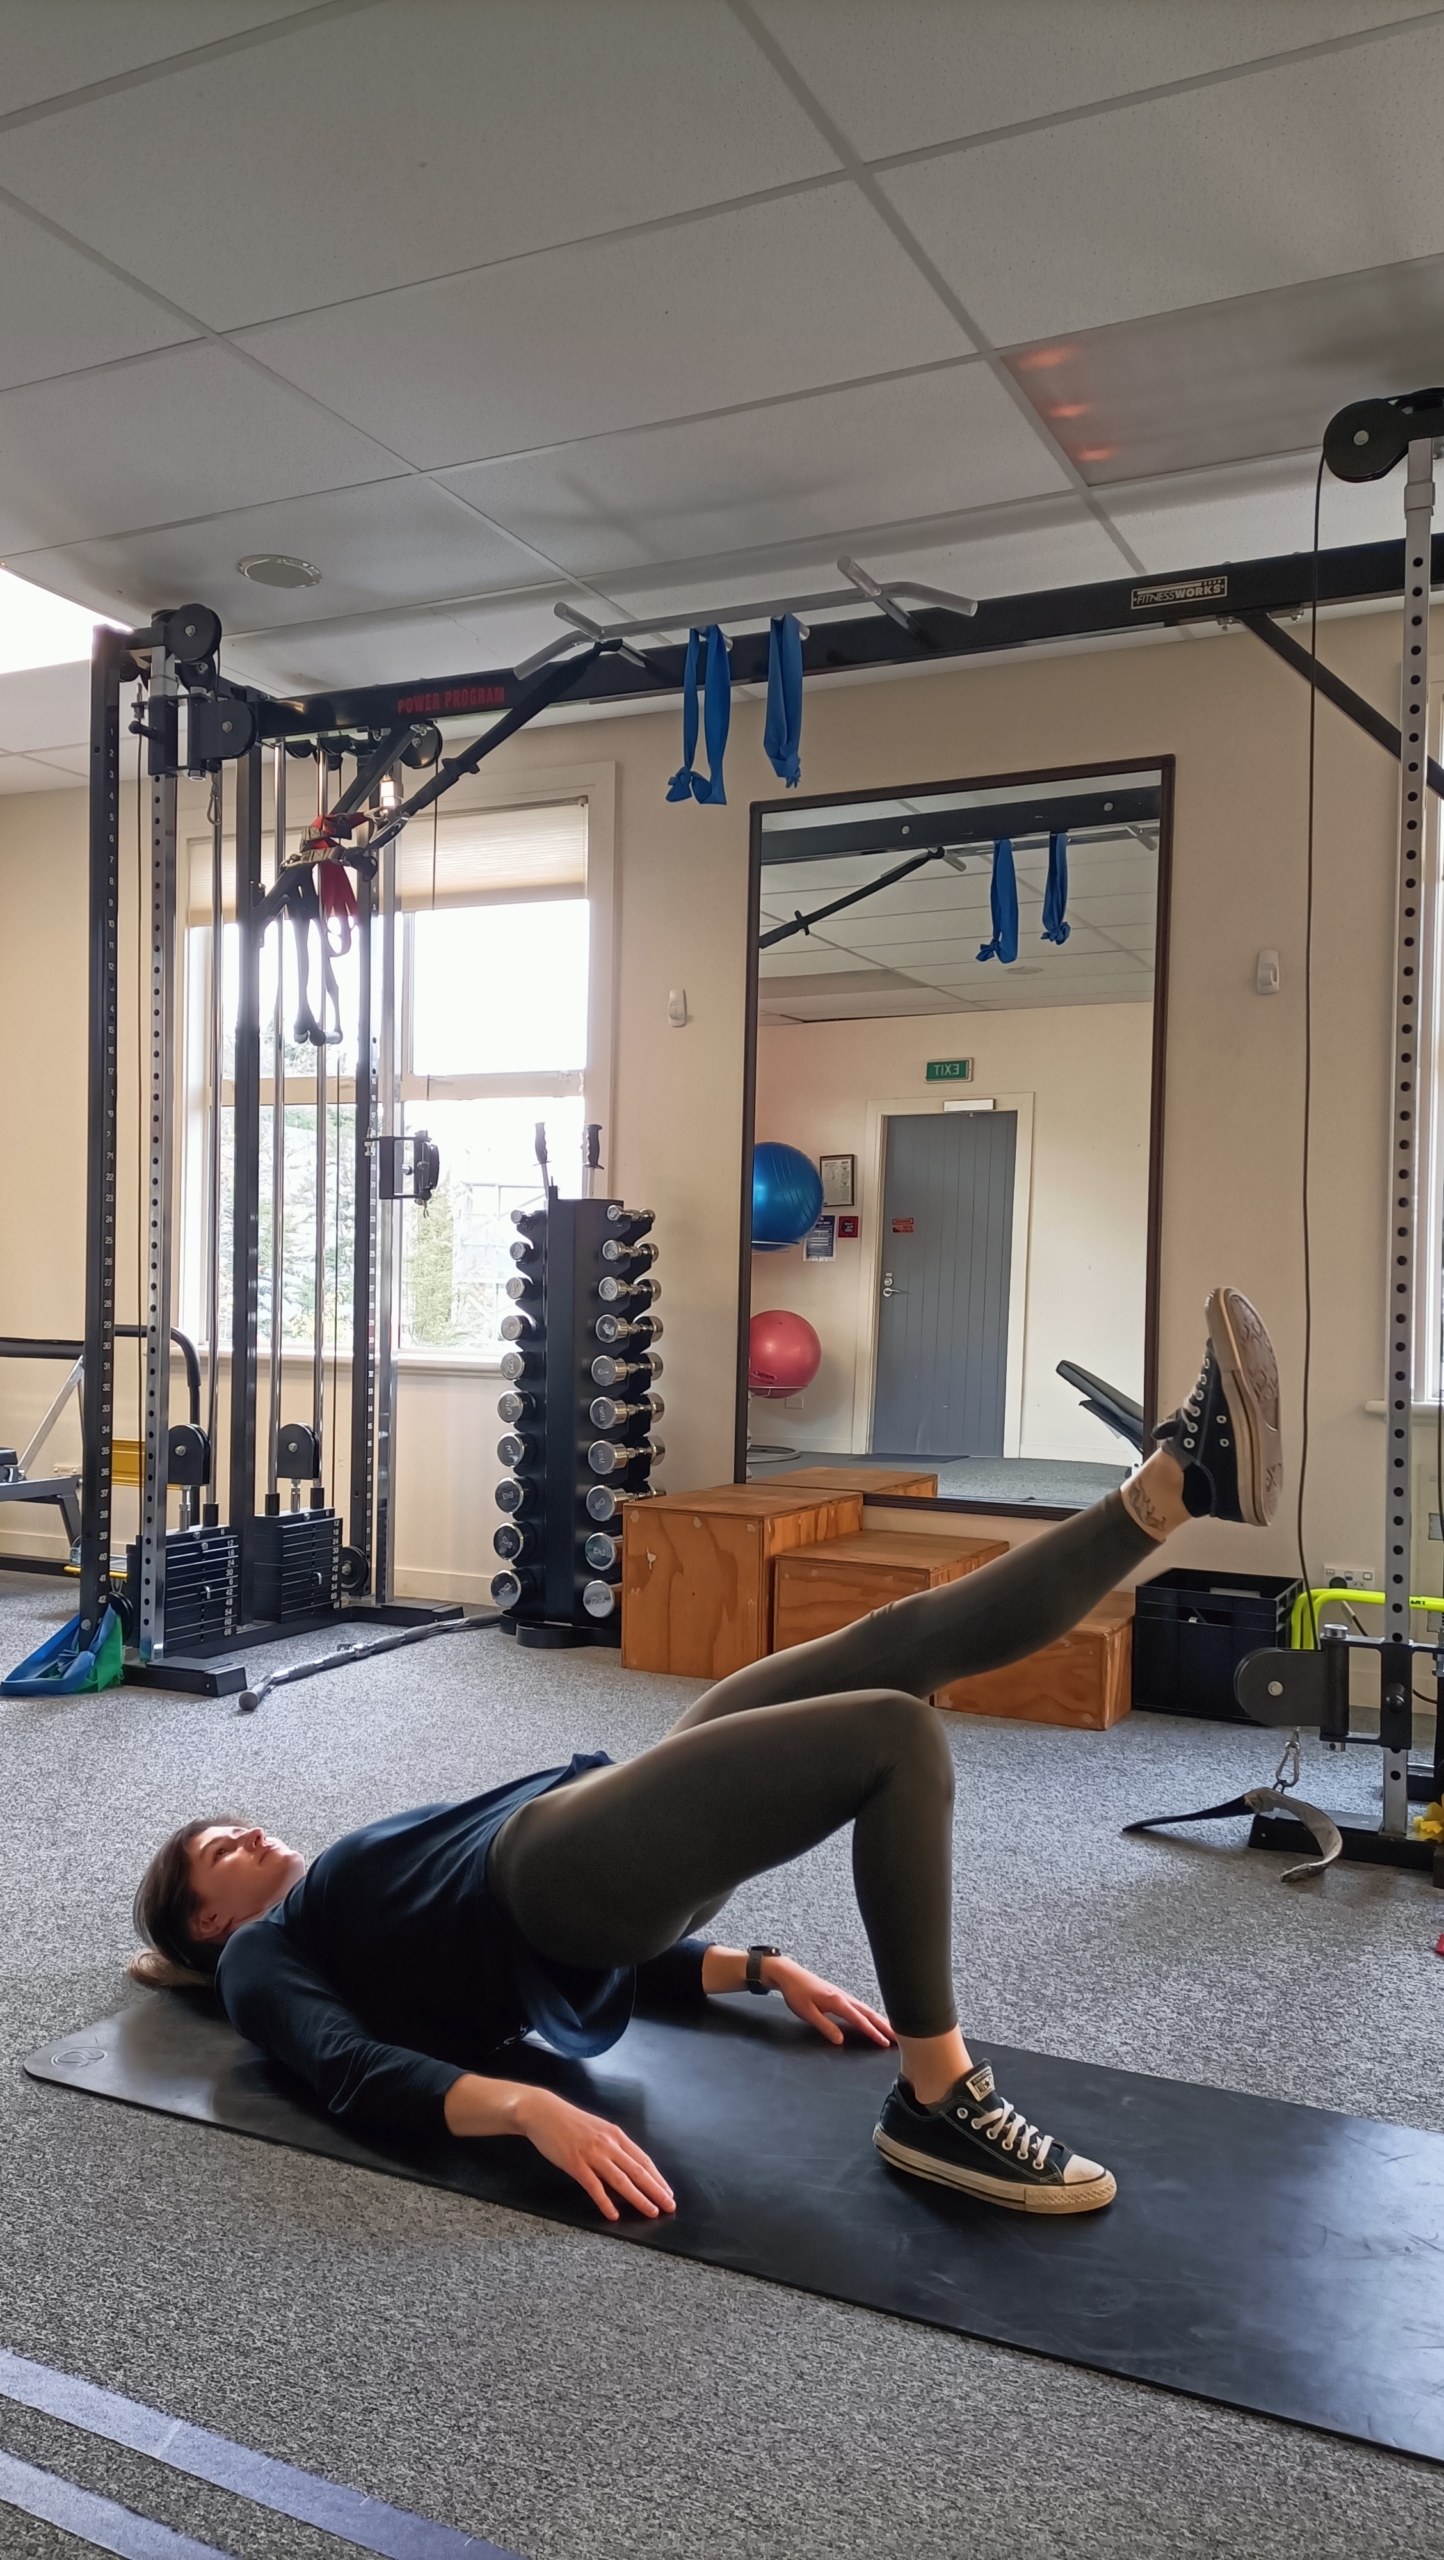
Single leg bridging: Lie on your back. Bend one leg upwards, placing the foot on the floor. Draw your other leg up to the same position, maintaining a hips width between
your legs. Lift one foot slightly off the floor. Using the effort of your remaining foot, lift your hips up into a bridge until you have a straight line from your shoulders to your knees. Lower back down and repeat. Keep your pelvis level throughout this exercise.

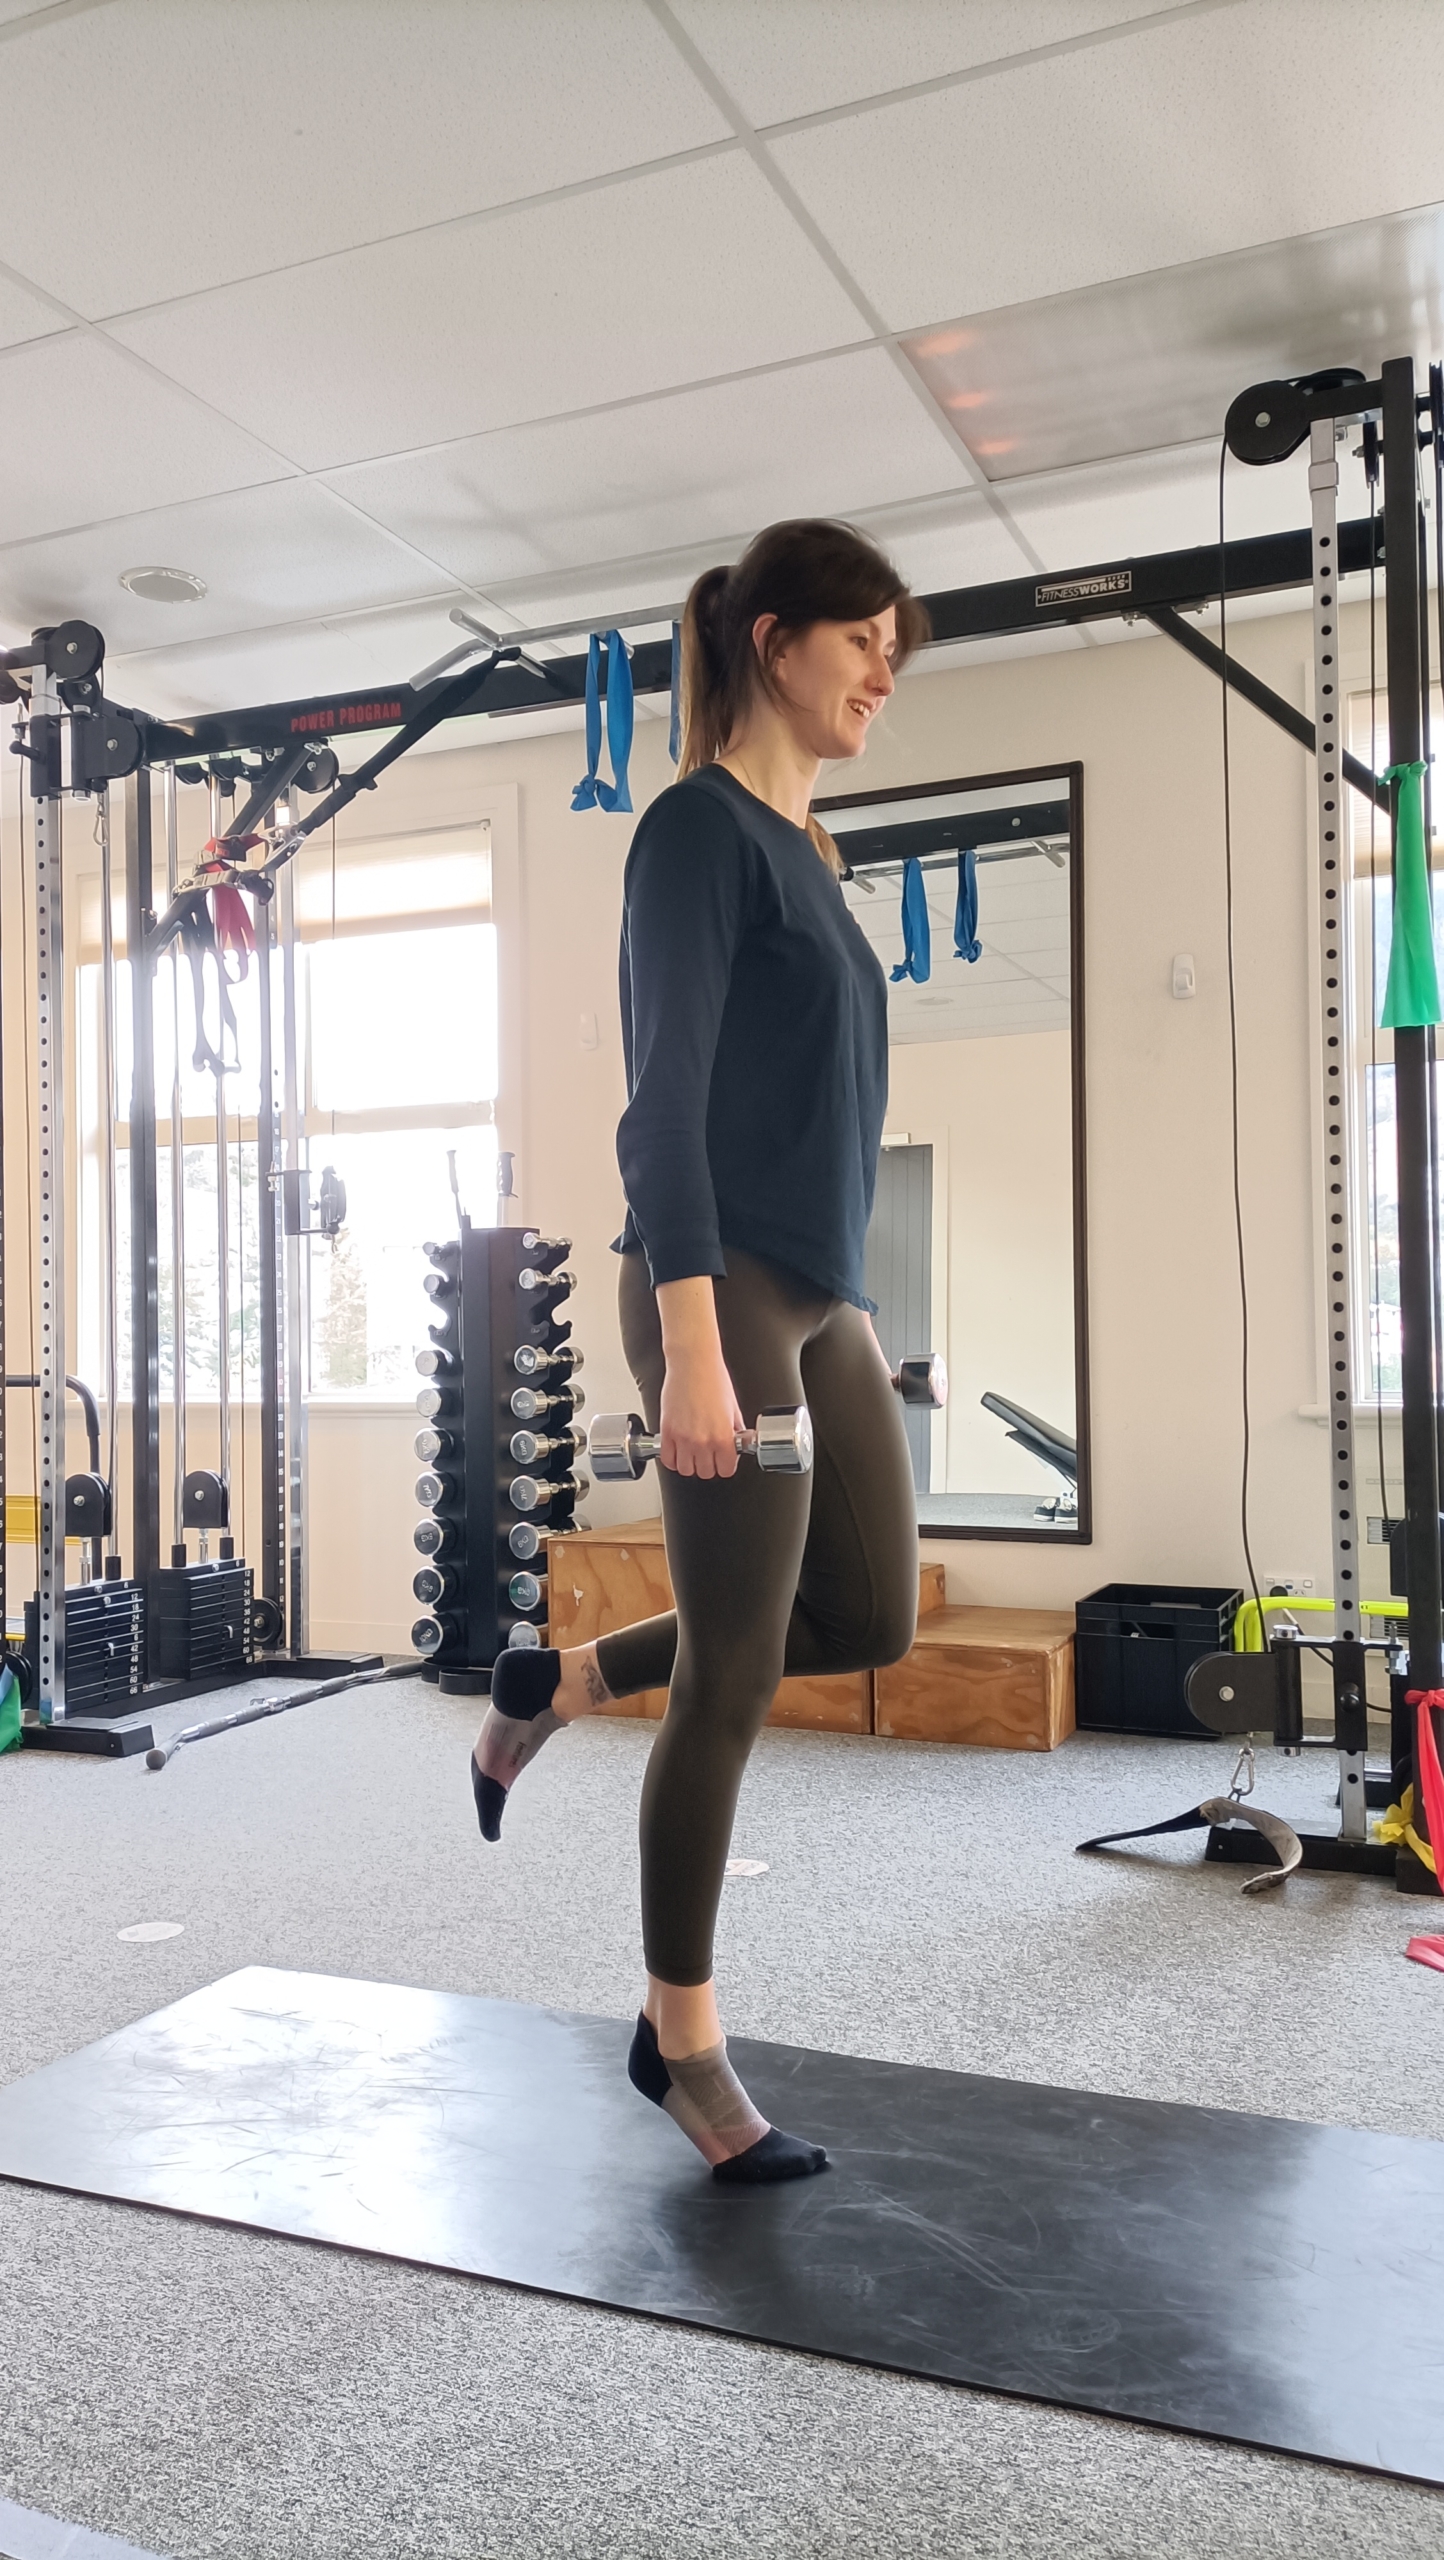
Single leg heel raise with weight: Stand up straight holding a weight in each hand. Move your weight onto the leg to be exercised, lifting your other from the floor. Ensure you to not rest your elevated leg on your stance leg. Keeping your gaze directly ahead and your knee straight, rise up onto the ball of your foot. Ensure you keep your core, buttocks and thigh muscles activated to help control this movement. Slowly lower your heel back to the floor and repeat.

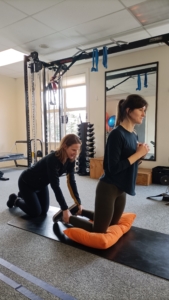
Nordic hamstring curl: This exercise requires a partner. – Start position is kneeling on the floor with the partner behind holding onto your heels to keep the legs in place. Lean forward from the waist slightly for three repetitions, returning to the starting position each time. Do not bend at the waist and keep the trunk and the thighs in line. After the first three repetitions, increase the forward lean a bit more for every movement until you reach an angle from which you are unable to return, then fall forward keeping the trunk rigid and use a push-up to return to the starting position

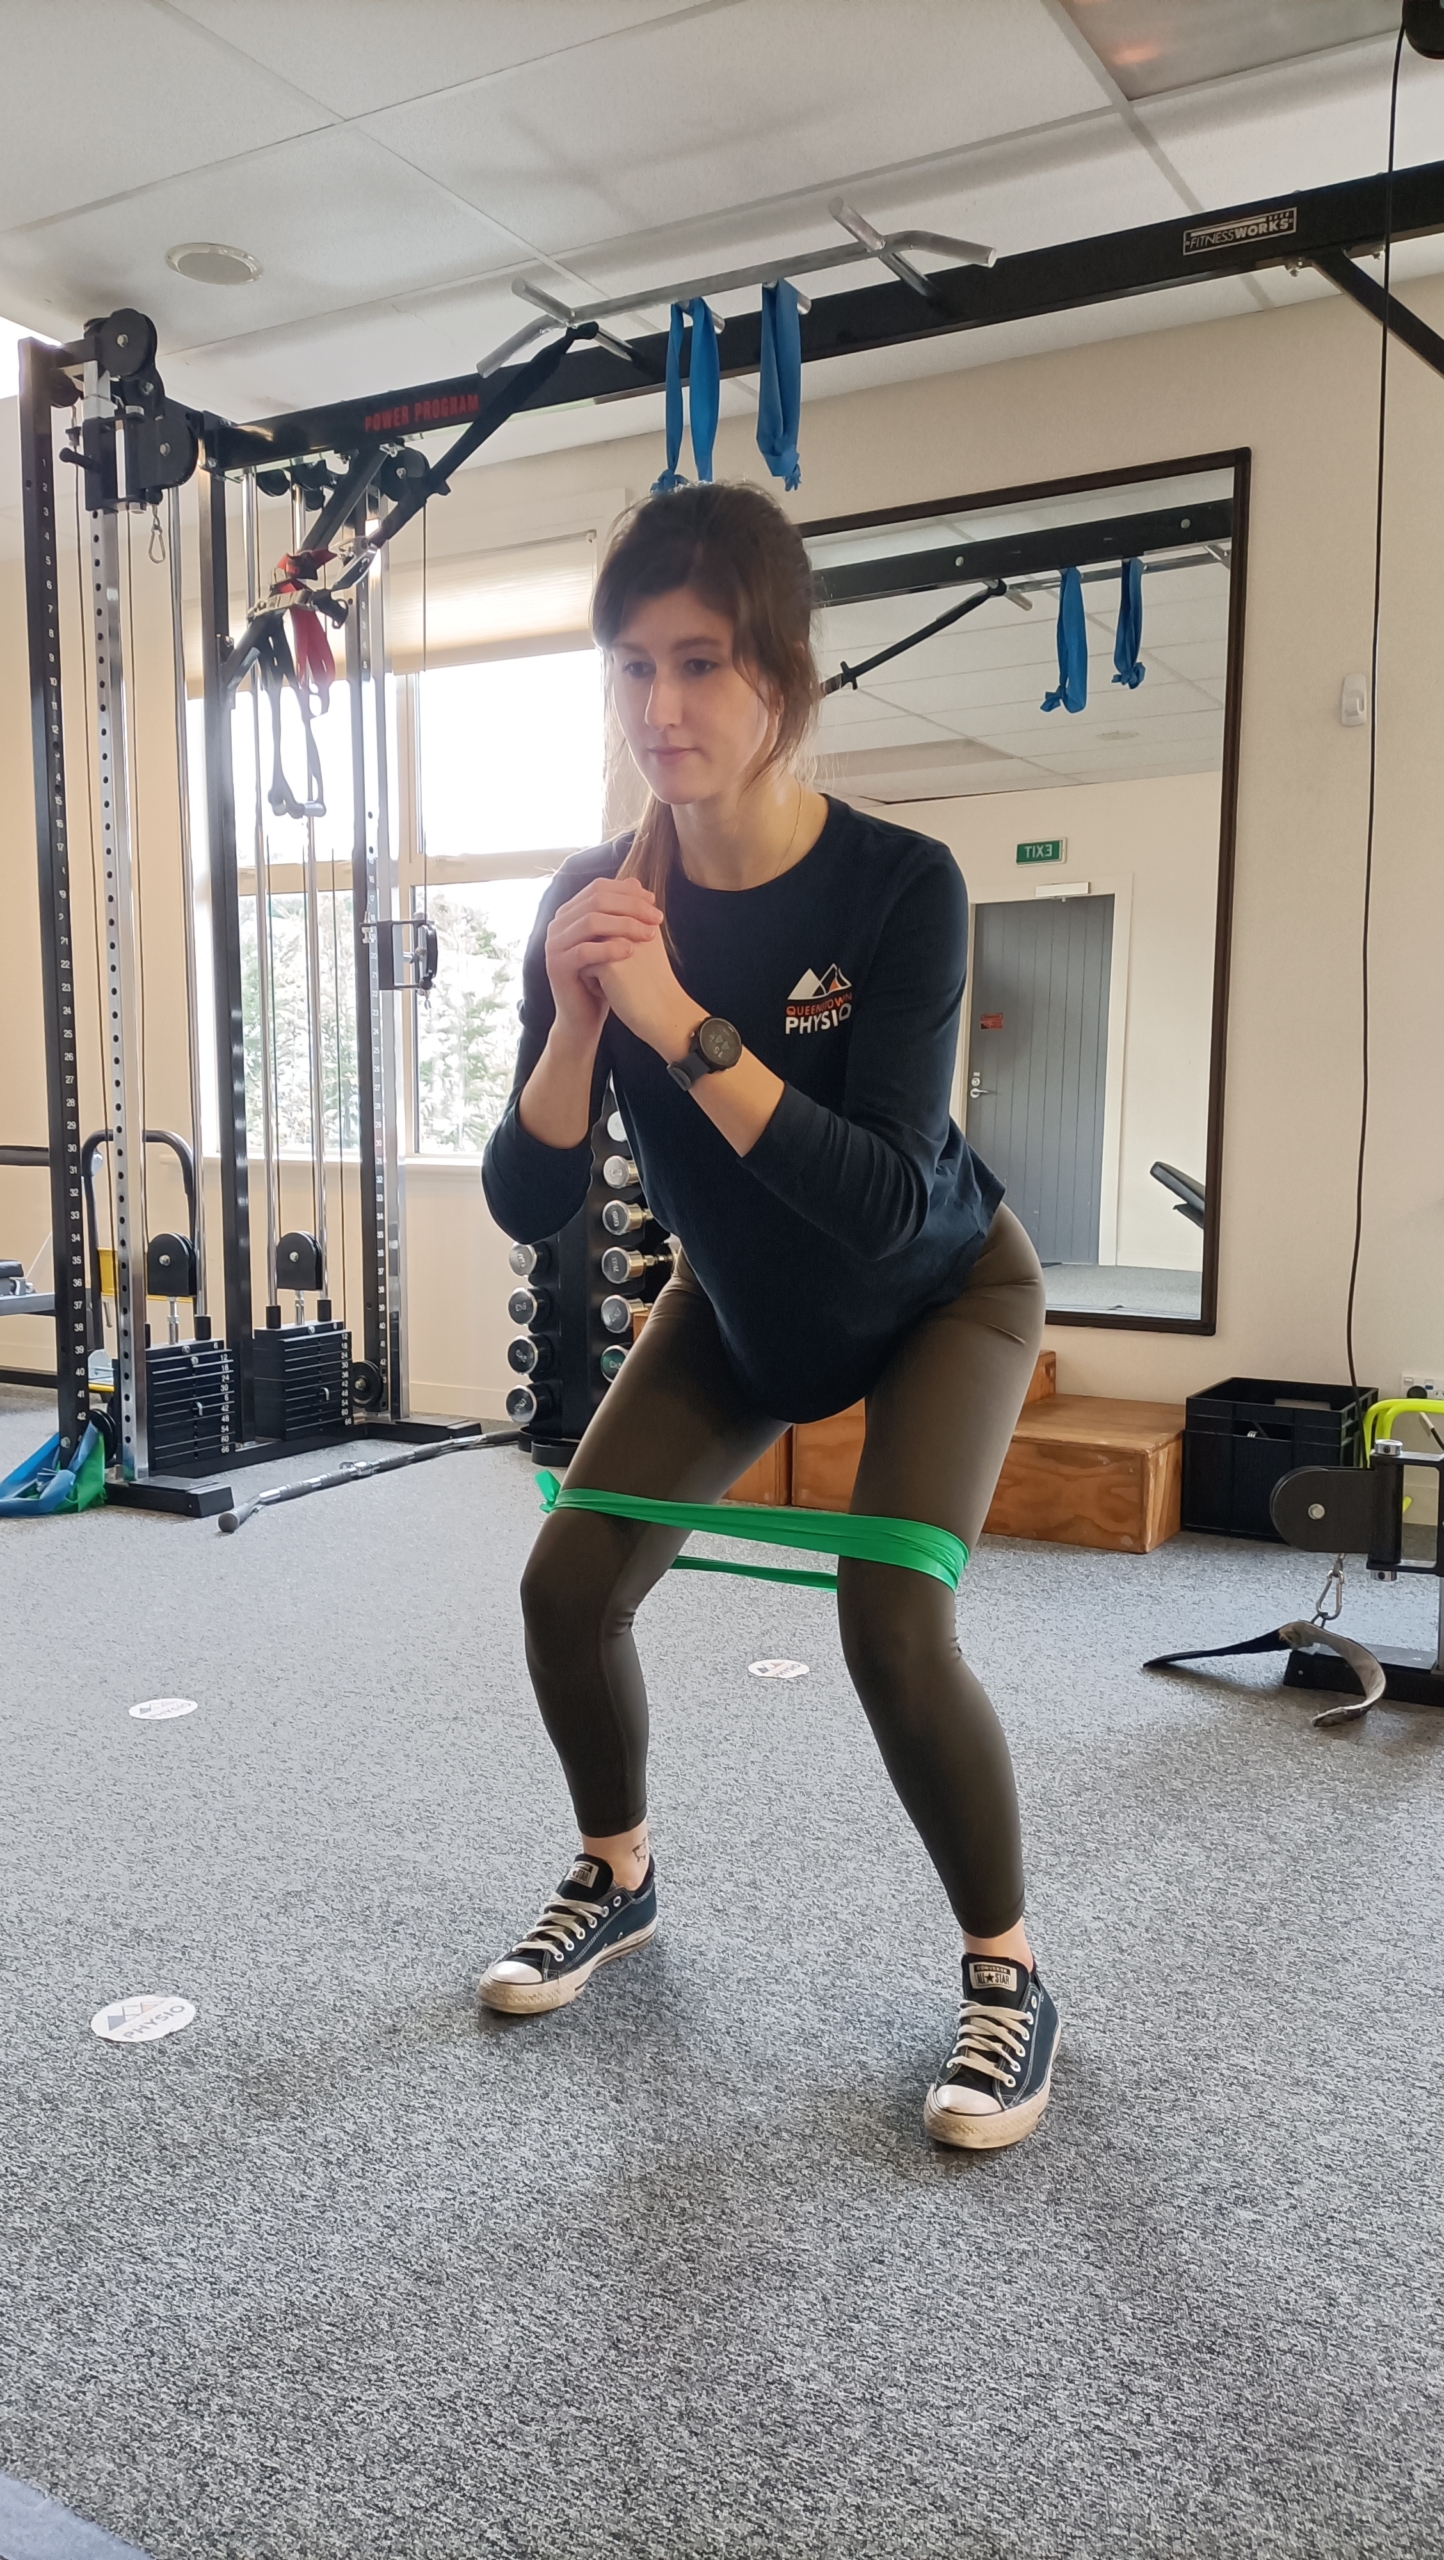
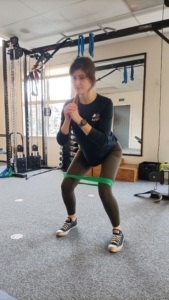
Resisted crab walks: Place a band around your ankles and gather some tension. Side-step keeping constant tension on the band. Make sure you do not bring your feet too close together and keep your toes and knees pointing forwards.

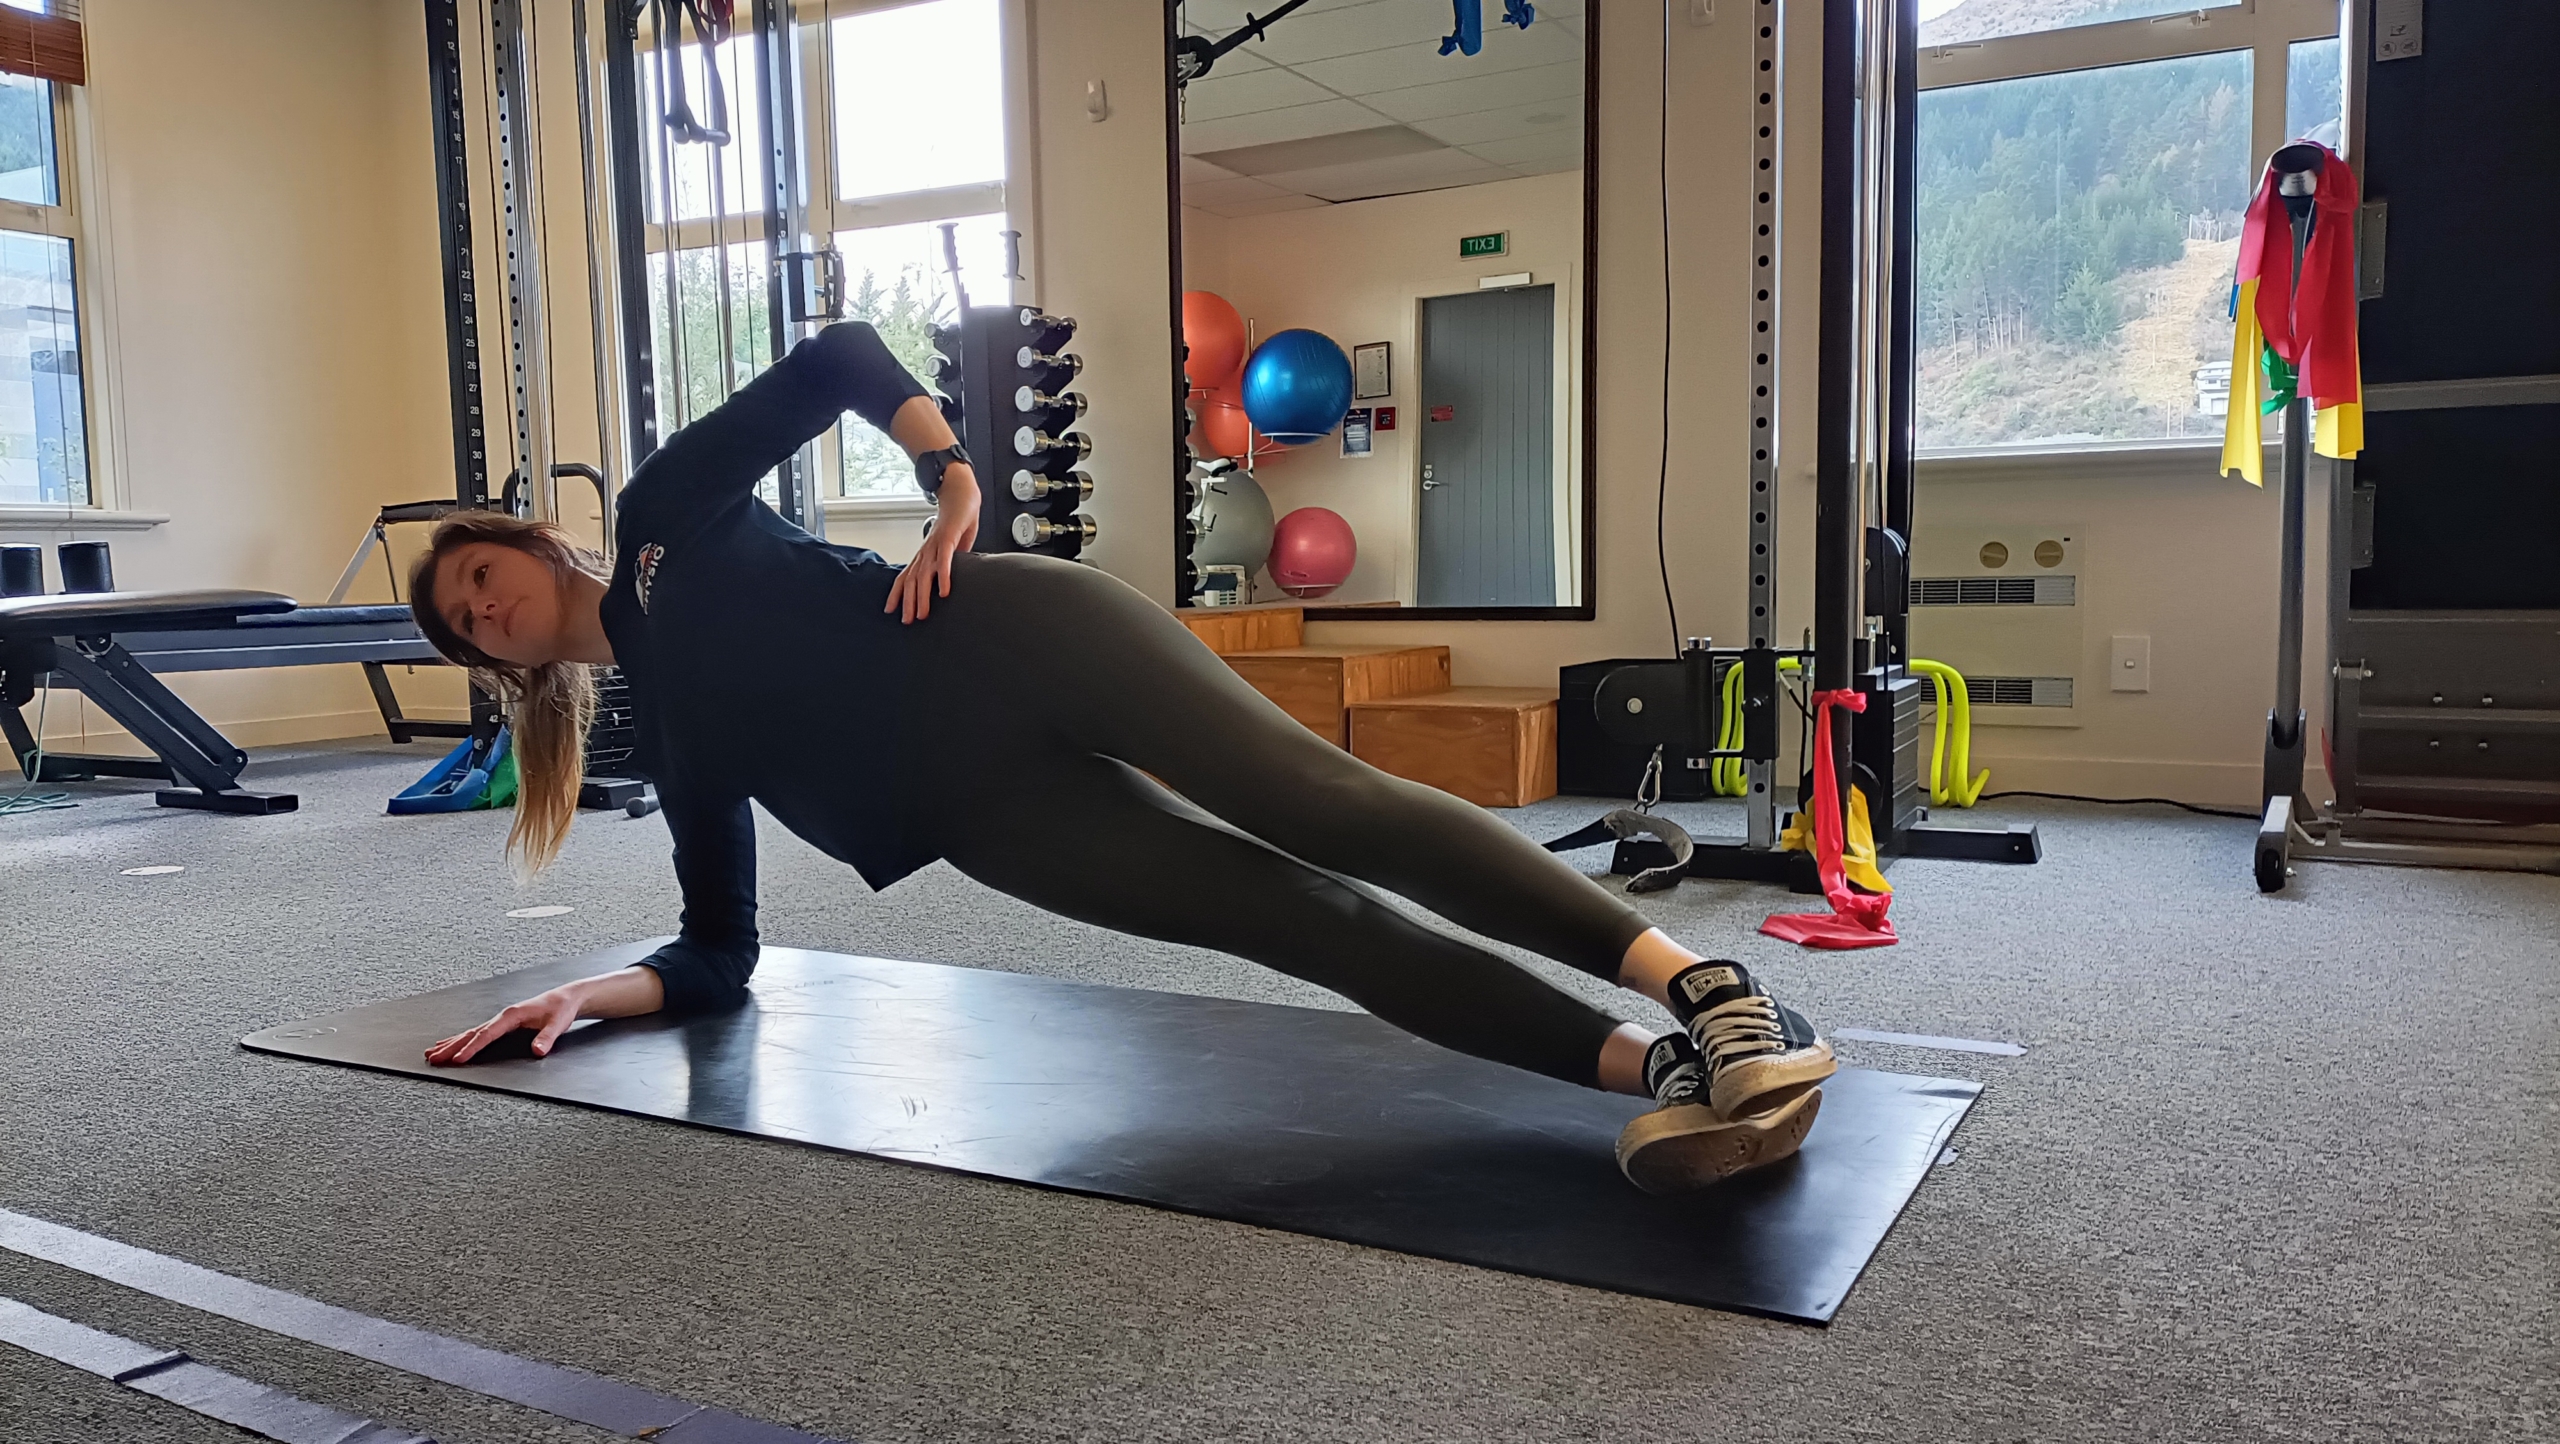
Side plank with dip: Lie on your side and lift yourself in to a plank on your elbow, with a straight line from your head to your feet. Drop your hips down until they are just off the floor, and then bring them back up.

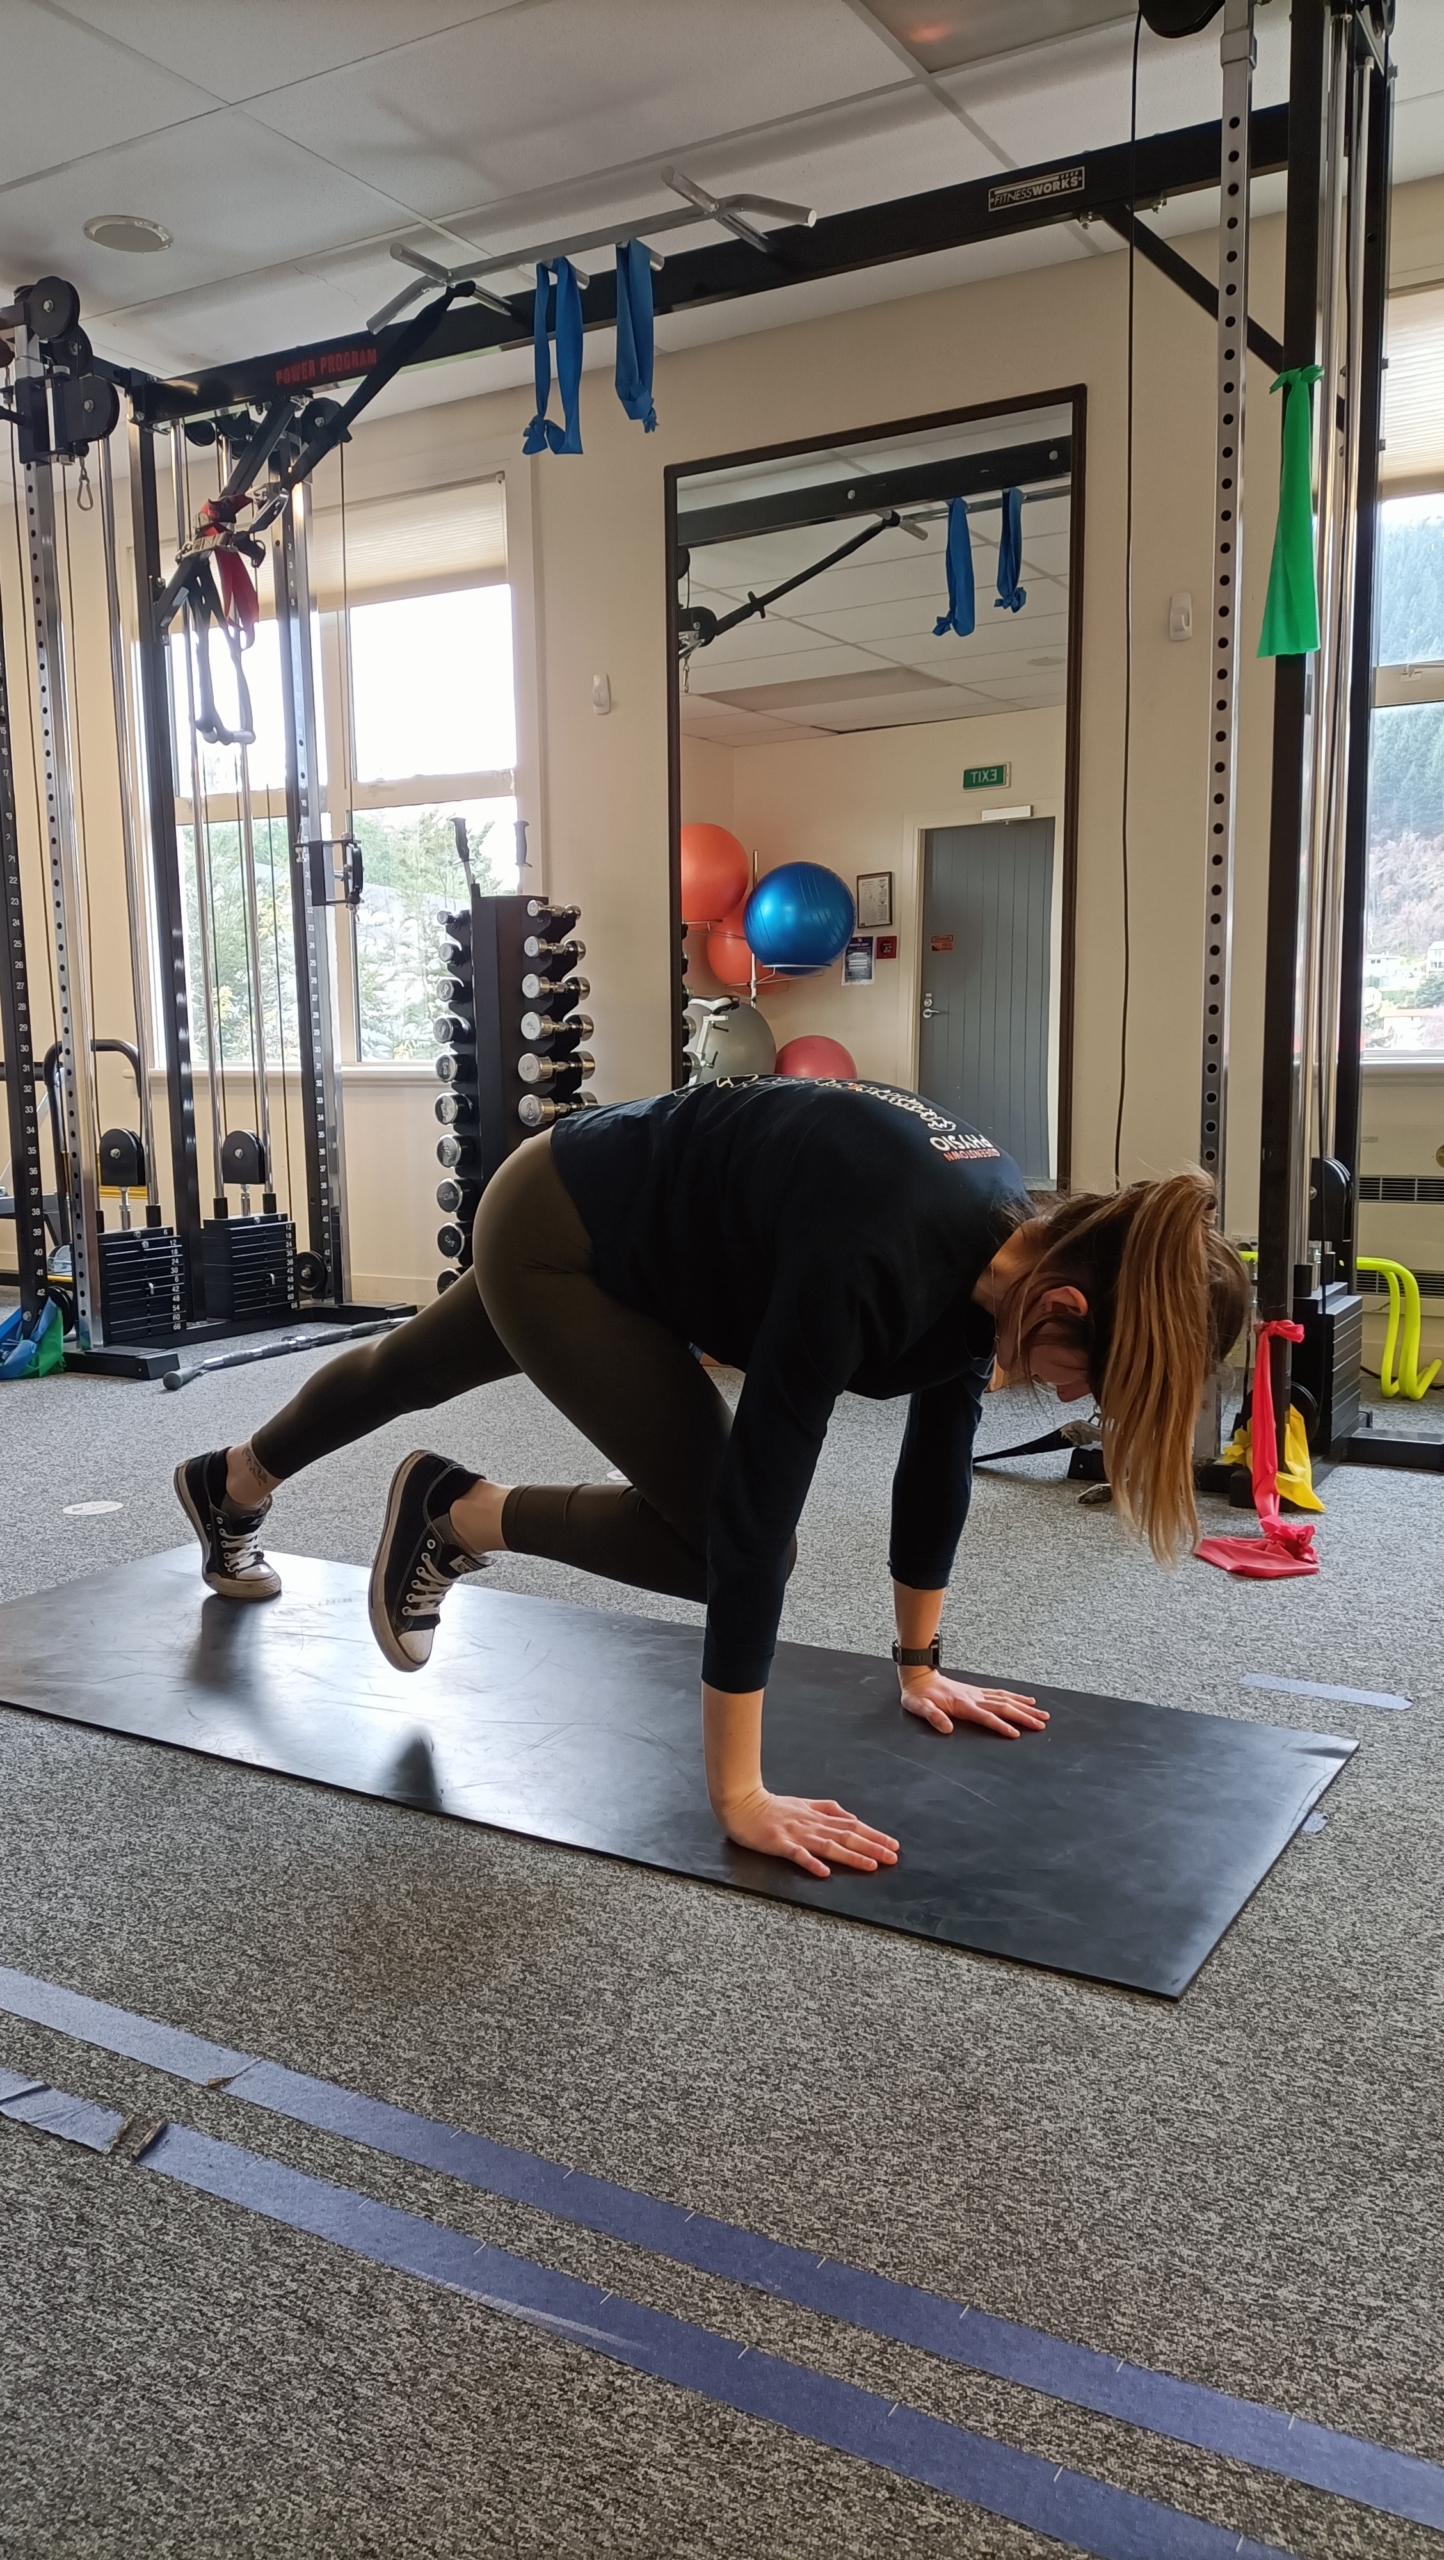
Mountain climbers: Adopt a plank position insuring your hands are directly beneath your shoulders. Fully flex one hip and hold. Extend the bent leg to the rear and repeat the movement pattern on the opposite side.

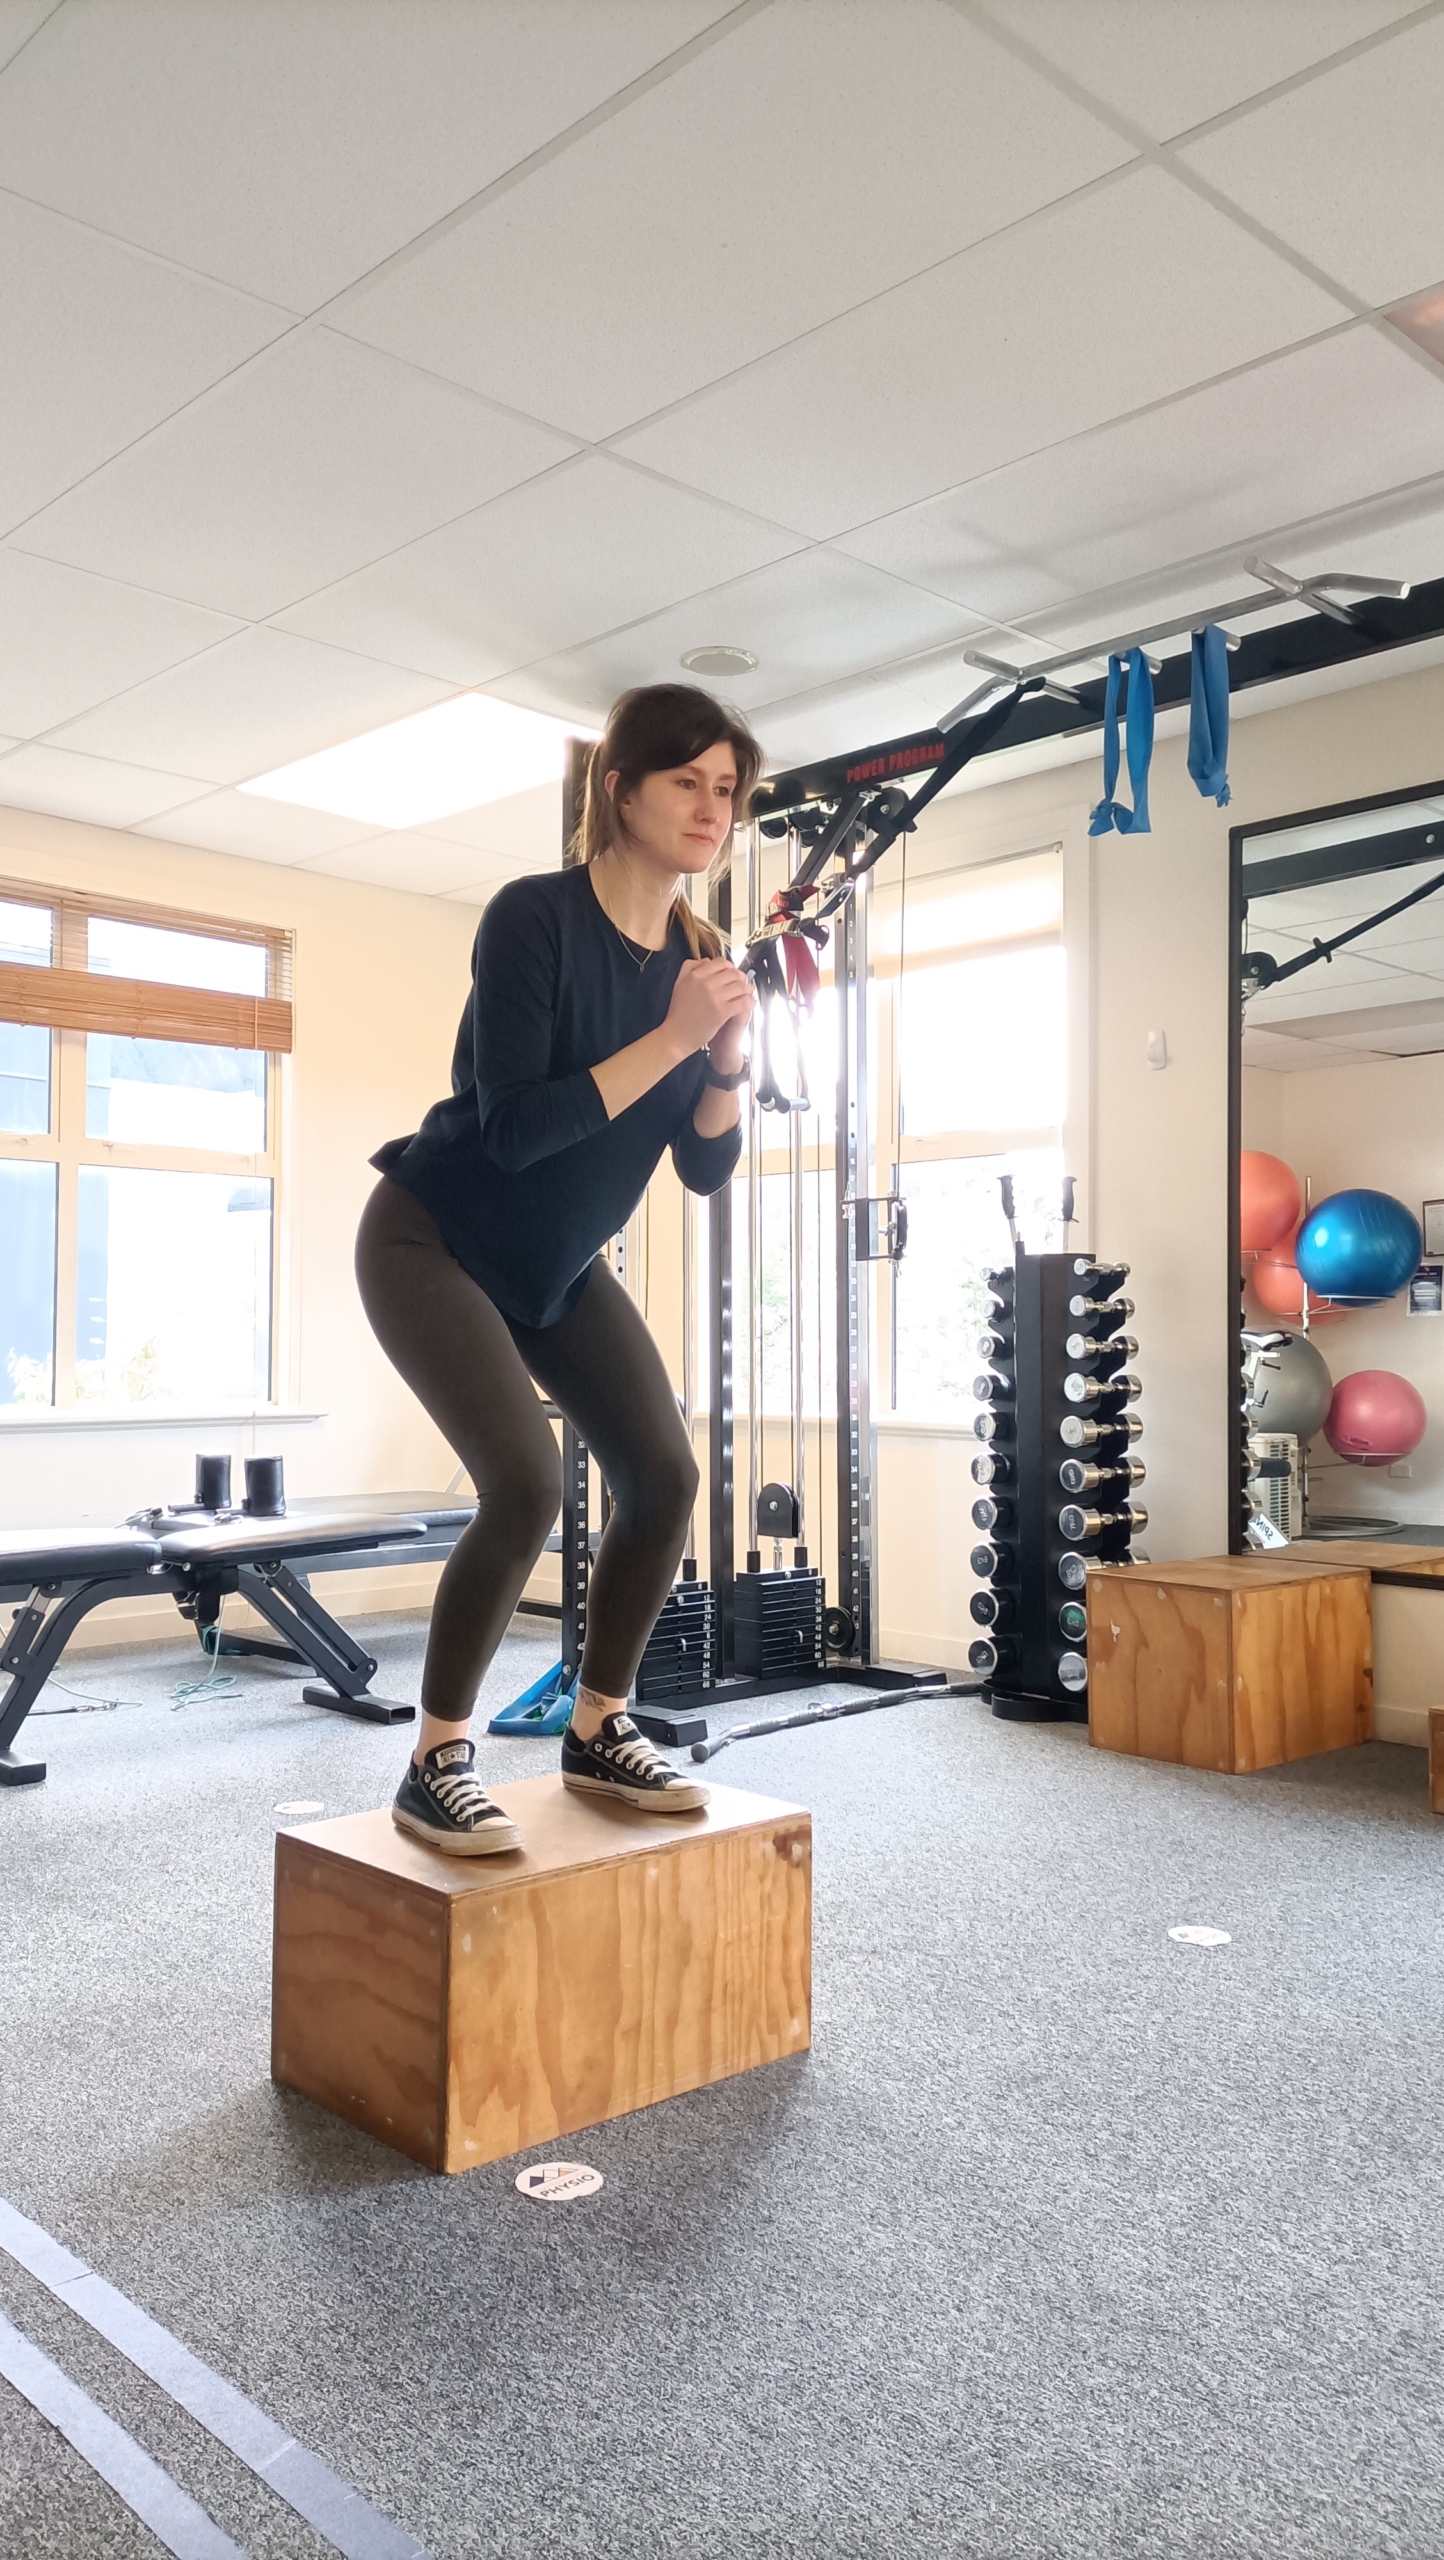
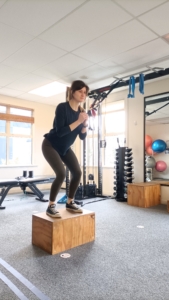
Box jumps on/off: Start Position is standing in front of a box or step with your feet shoulder width apart. Perform a short squat in preparation for jumping at the same time swinging your
arms behind you. Rebound out of this position, extending through the hips, knees, and ankles to jump as high as possible. Swing your arms forward and up. Land on the box with your knees bent, absorbing the impact through the legs. Jump off the box landing on the balls of the feet and heels absorbing the impact through the knees and hips.

Plyometric alternating lateral hop: Stand up straight with a line marker on each of your sides. Transfer your weight onto one foot and lift your other off the floor. Using your arms to generate momentum, hop sideways over one line landing lightly on your foot, then immediately hop sideways over the other line landing on your other foot. Continue as instructed.

Single leg stand on BOSU throw/catch against wall (stand on round side): Place a BOSU onto its flat side on the floor in front of a wall. Stand on one leg on the rounded side of the BOSU and gain your balance. Throw the ball against the wall, keeping your balance as you catch it. Repeat this movement, trying to keep the BOSU as steady as possible.

Slippery Slopes? Queenstown Physio’s Guide to Recovery this Winter

Acute joint and muscle injuries can be very painful, cause swelling and heat in the area, and can also cause painful muscle spasm. If you are unlucky enough to injure yourself on the slopes this winter, here are some helpful tips to guide you through the first 24-48 hours following injury.

1. Remain Calm
Injuries that occur on the slopes are usually fast, and unexpected! It’s normal to feel shocked, and emotional on top of the pain experienced at the sit of injury. Try to remain calm, take some deep breaths to clear your head, then focus on getting help.

2. Get to Safety and/or Get Help!
If you are in the middle of a busy slope it’s important to get to safety. You don’t need anyone bumping into you after injury, and equally you can risk injuring others if you are stopped in the middle of a slope. Get to the side of the slope if possible. If you are unable to stand, ride, or walk to the edge – put your hands up and flag down a passer-by for some help. Attention the medic or ask someone to call one.

3. Get RICE (Rest, Ice, Compression, Elevation)
Most acute injuries benefit from using the RICE method to control pain and swelling in the first 48- 72 hours post-injury.

REST
Take it easy, but don’t stop moving the affected area completely. Move as much as you can tolerate, but don’t force painful movements – this will help the injured tissue to repair. Enjoy a cup of hot chocolate and relax!

ICE
As soon as possible apply ice wrapped in a damp towel to the injured area. Leave it there for 15-20 minutes and repeat 4-8 times daily for at least 48 hours. You cannot do this too much!

COMPRESSION
Use elastic wrap or a bandage to apply compression to the injured area. If you experience throbbing, tingling, numbness, or blue looking skin in the area then the compression is too tight!! Remove it and re-wrap with less pressure. Do not use compression at night as you cannot monitor the area while asleep.

ELEVATION
When it comes to swelling, gravity is not your friend! Keep the injured area elevated while resting, aiming to have it higher than your heart. This will limit and help to reduce swelling. Use pillows during the day or night to support the injured area.

4. Analgesia and Rest
Take some simple pain-relieving medication. Using pain-relief will allow you to move more freely, get some restful sleep, and can prevent secondary injury. If you are unsure which medication to take, or are unsure if a medication is safe for you – consult the medic or a doctor.

5. Slippery Slope
Don’t be tempted to resume skiing or snowboarding if you have not fully recovered! This is a slippery
slope and something many people do to avoid missing out on time enjoying the sport or their holiday – be warned that it usually ends in further injury or prolonged recovery!

6. Get it Checked
If your injury is not improving, is slow to recover, or you are concerned about it for any reason – get
professional advice from a physiotherapist or doctor. Queenstown Physio offers appointments Monday to Friday in
Queenstown and Frankton with a team of experienced physiotherapists – give us a call or book online.